Hello World Example
This page goes through a simple "Hello World" example in ADOxx.
Introduction
This example produces a simple modelling tool which allows to create two types of objects ("Hello" and "World") and relations to connect the objects. The desired result for a modelling tool should look something like: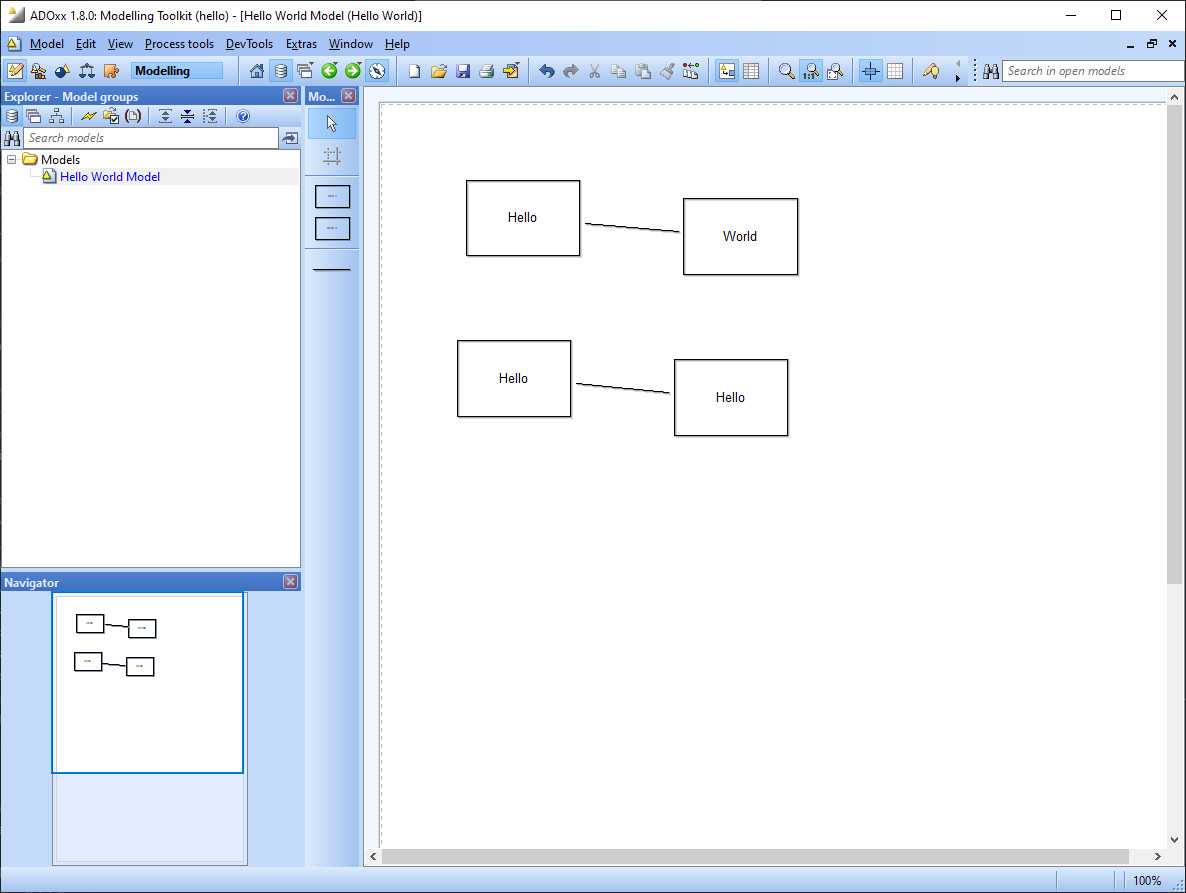
The general approach in this case is:
- Create a library.
- Create the relevant classes and configure their details.
- Specify a model type.
All of the steps are performed in the Development Toolkit, so start the Development Toolkit and log in with the Admin user before continuing.
Create Hello World Library
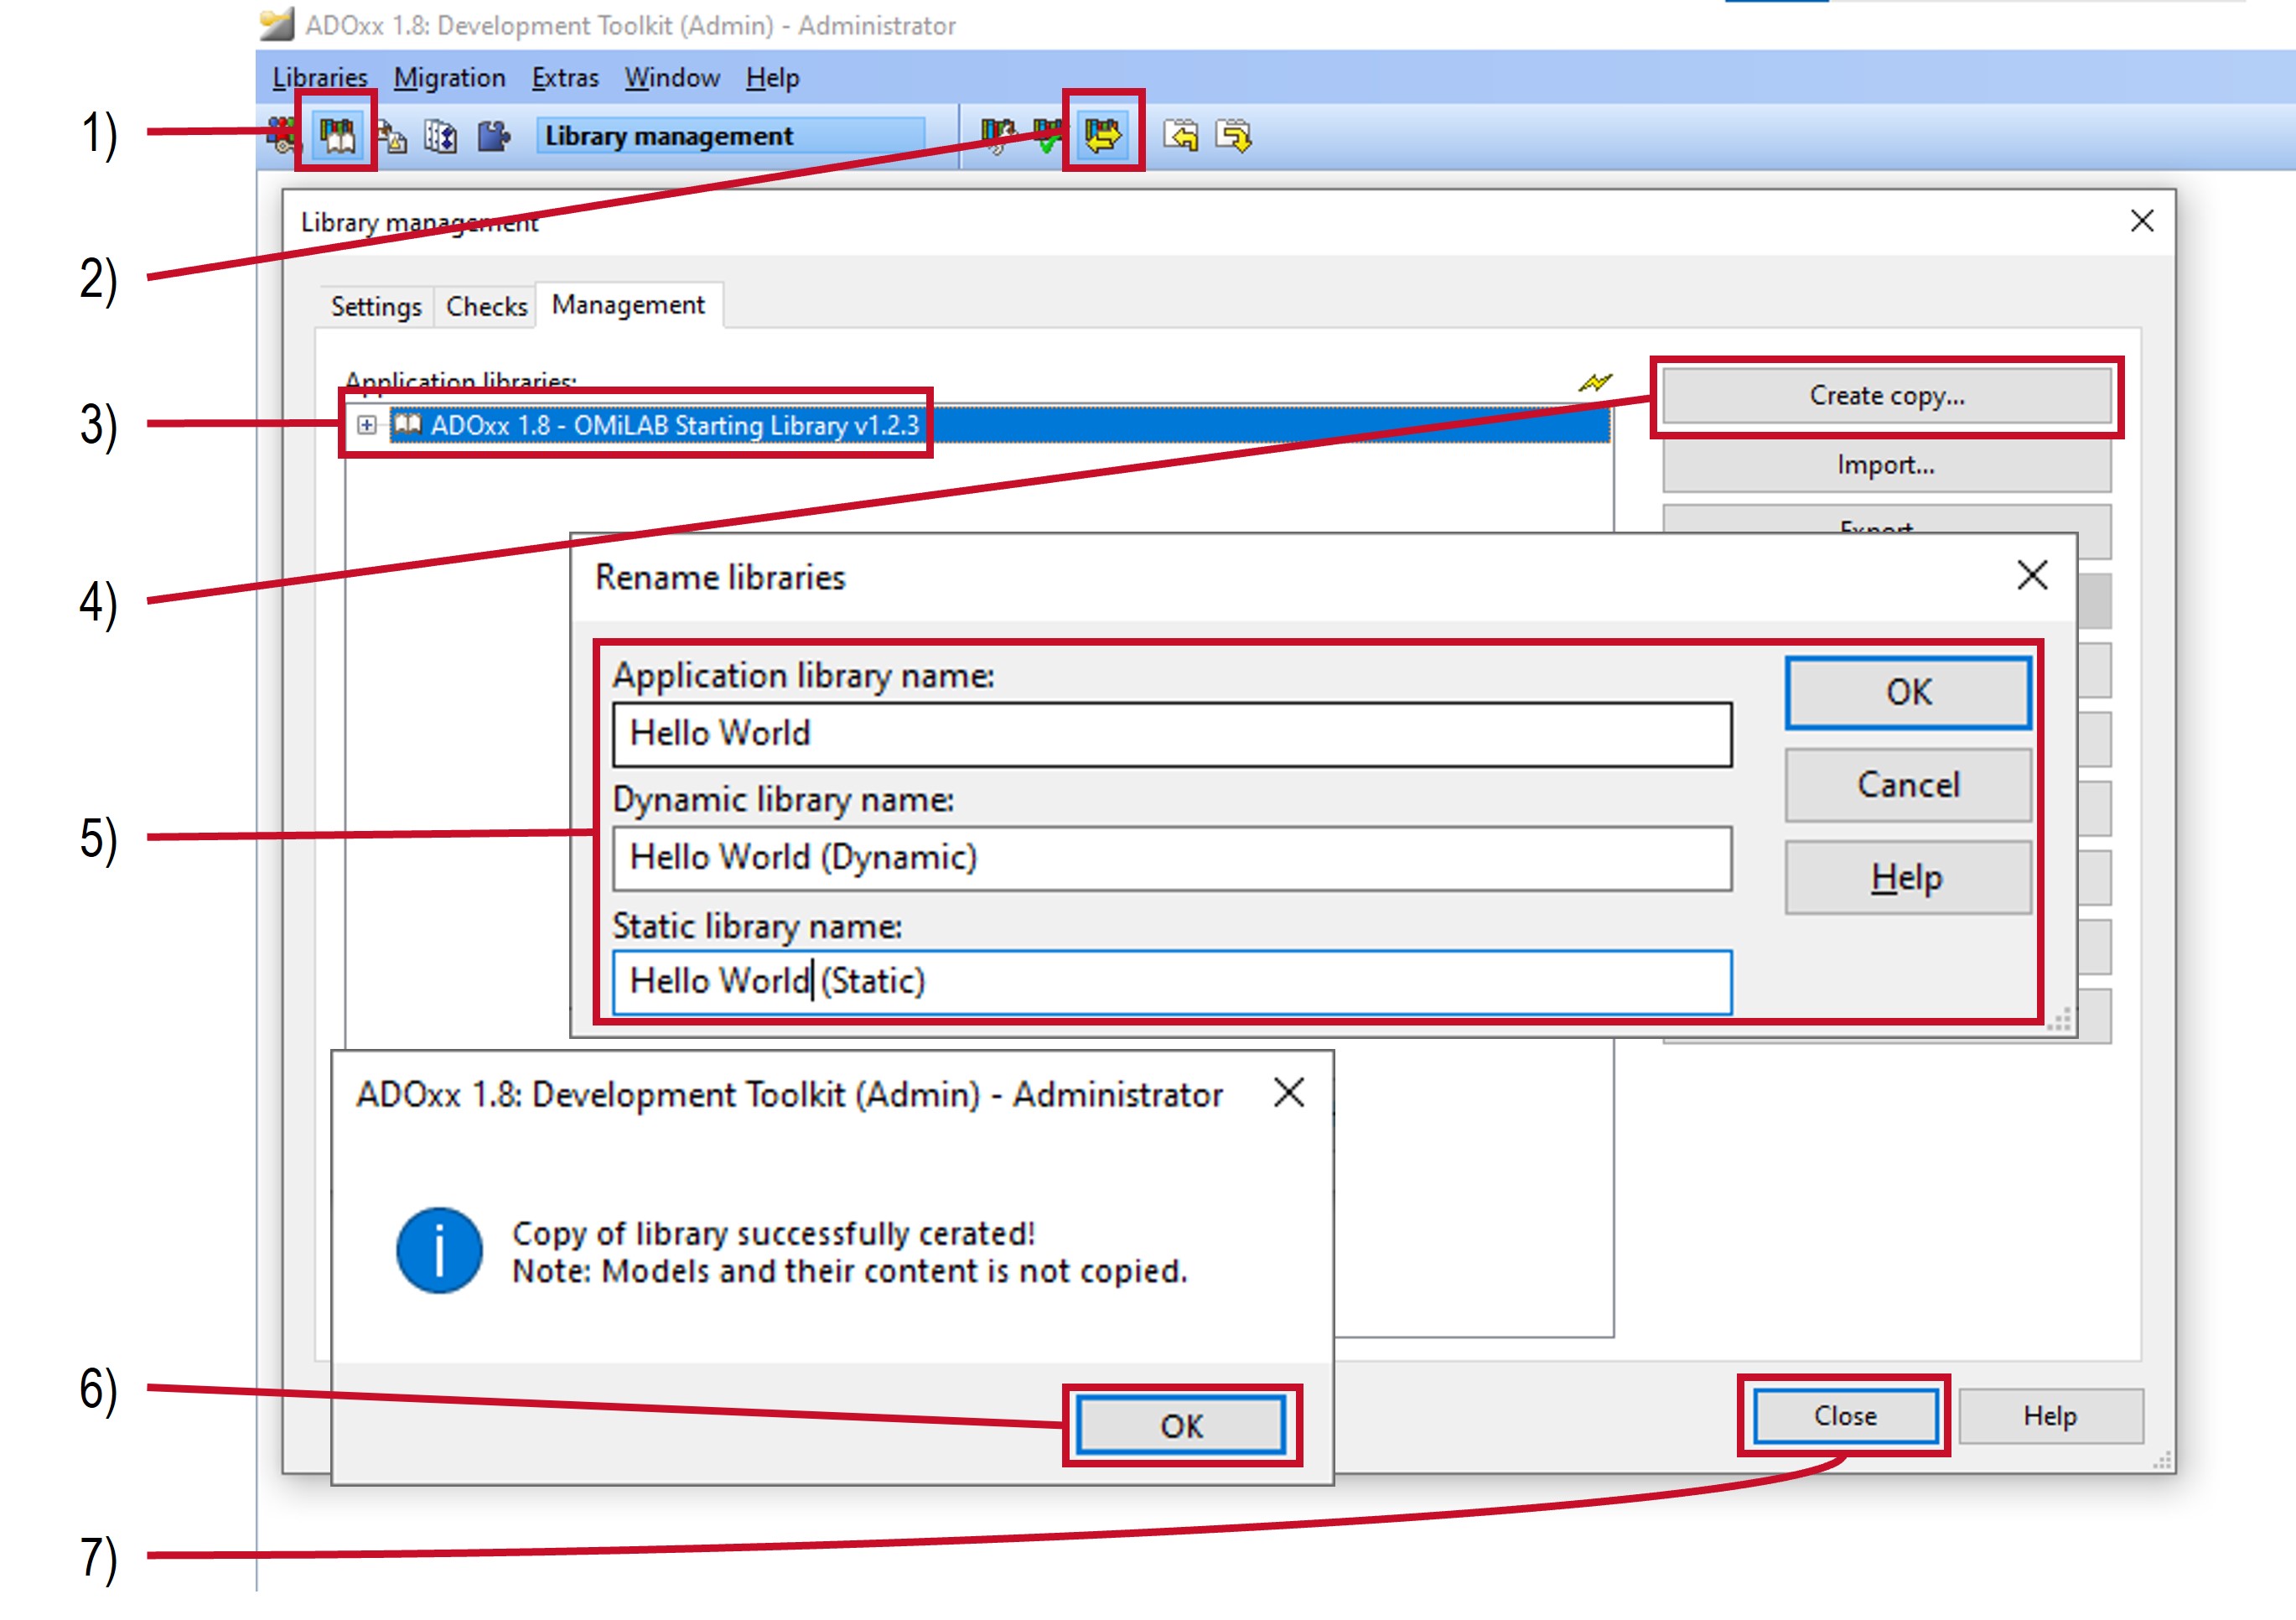
Application Libraries are not created from scratch. Instead they are created as a copy from an existing one. This can be achieved with the following steps:
- Select the
 Library management component in the Development Toolkit.
 - Select Libraries -> Management... in the menu or the
 Management icon in the quick access bar.
 - Select the "ADOxx ... OMiLAB Starting Library ...".
- Select the Create copy... button.
- When prompted enter a new name for the three libraries and select OK:
- Application library name:
Hello World - Dynamic library name:
Hello World (Dynamic) - Static library name:
Hello World (Static)
- Application library name:
- Confirm the pop-up dialog.
- Close the Library Management dialog.
For more details on application libraries see the Application Library page.
Create Hello World Classes
Creating and configuring classes is achieved through the class-hierarchy dialog in ADOxx.
Open the Class-Hierarchy
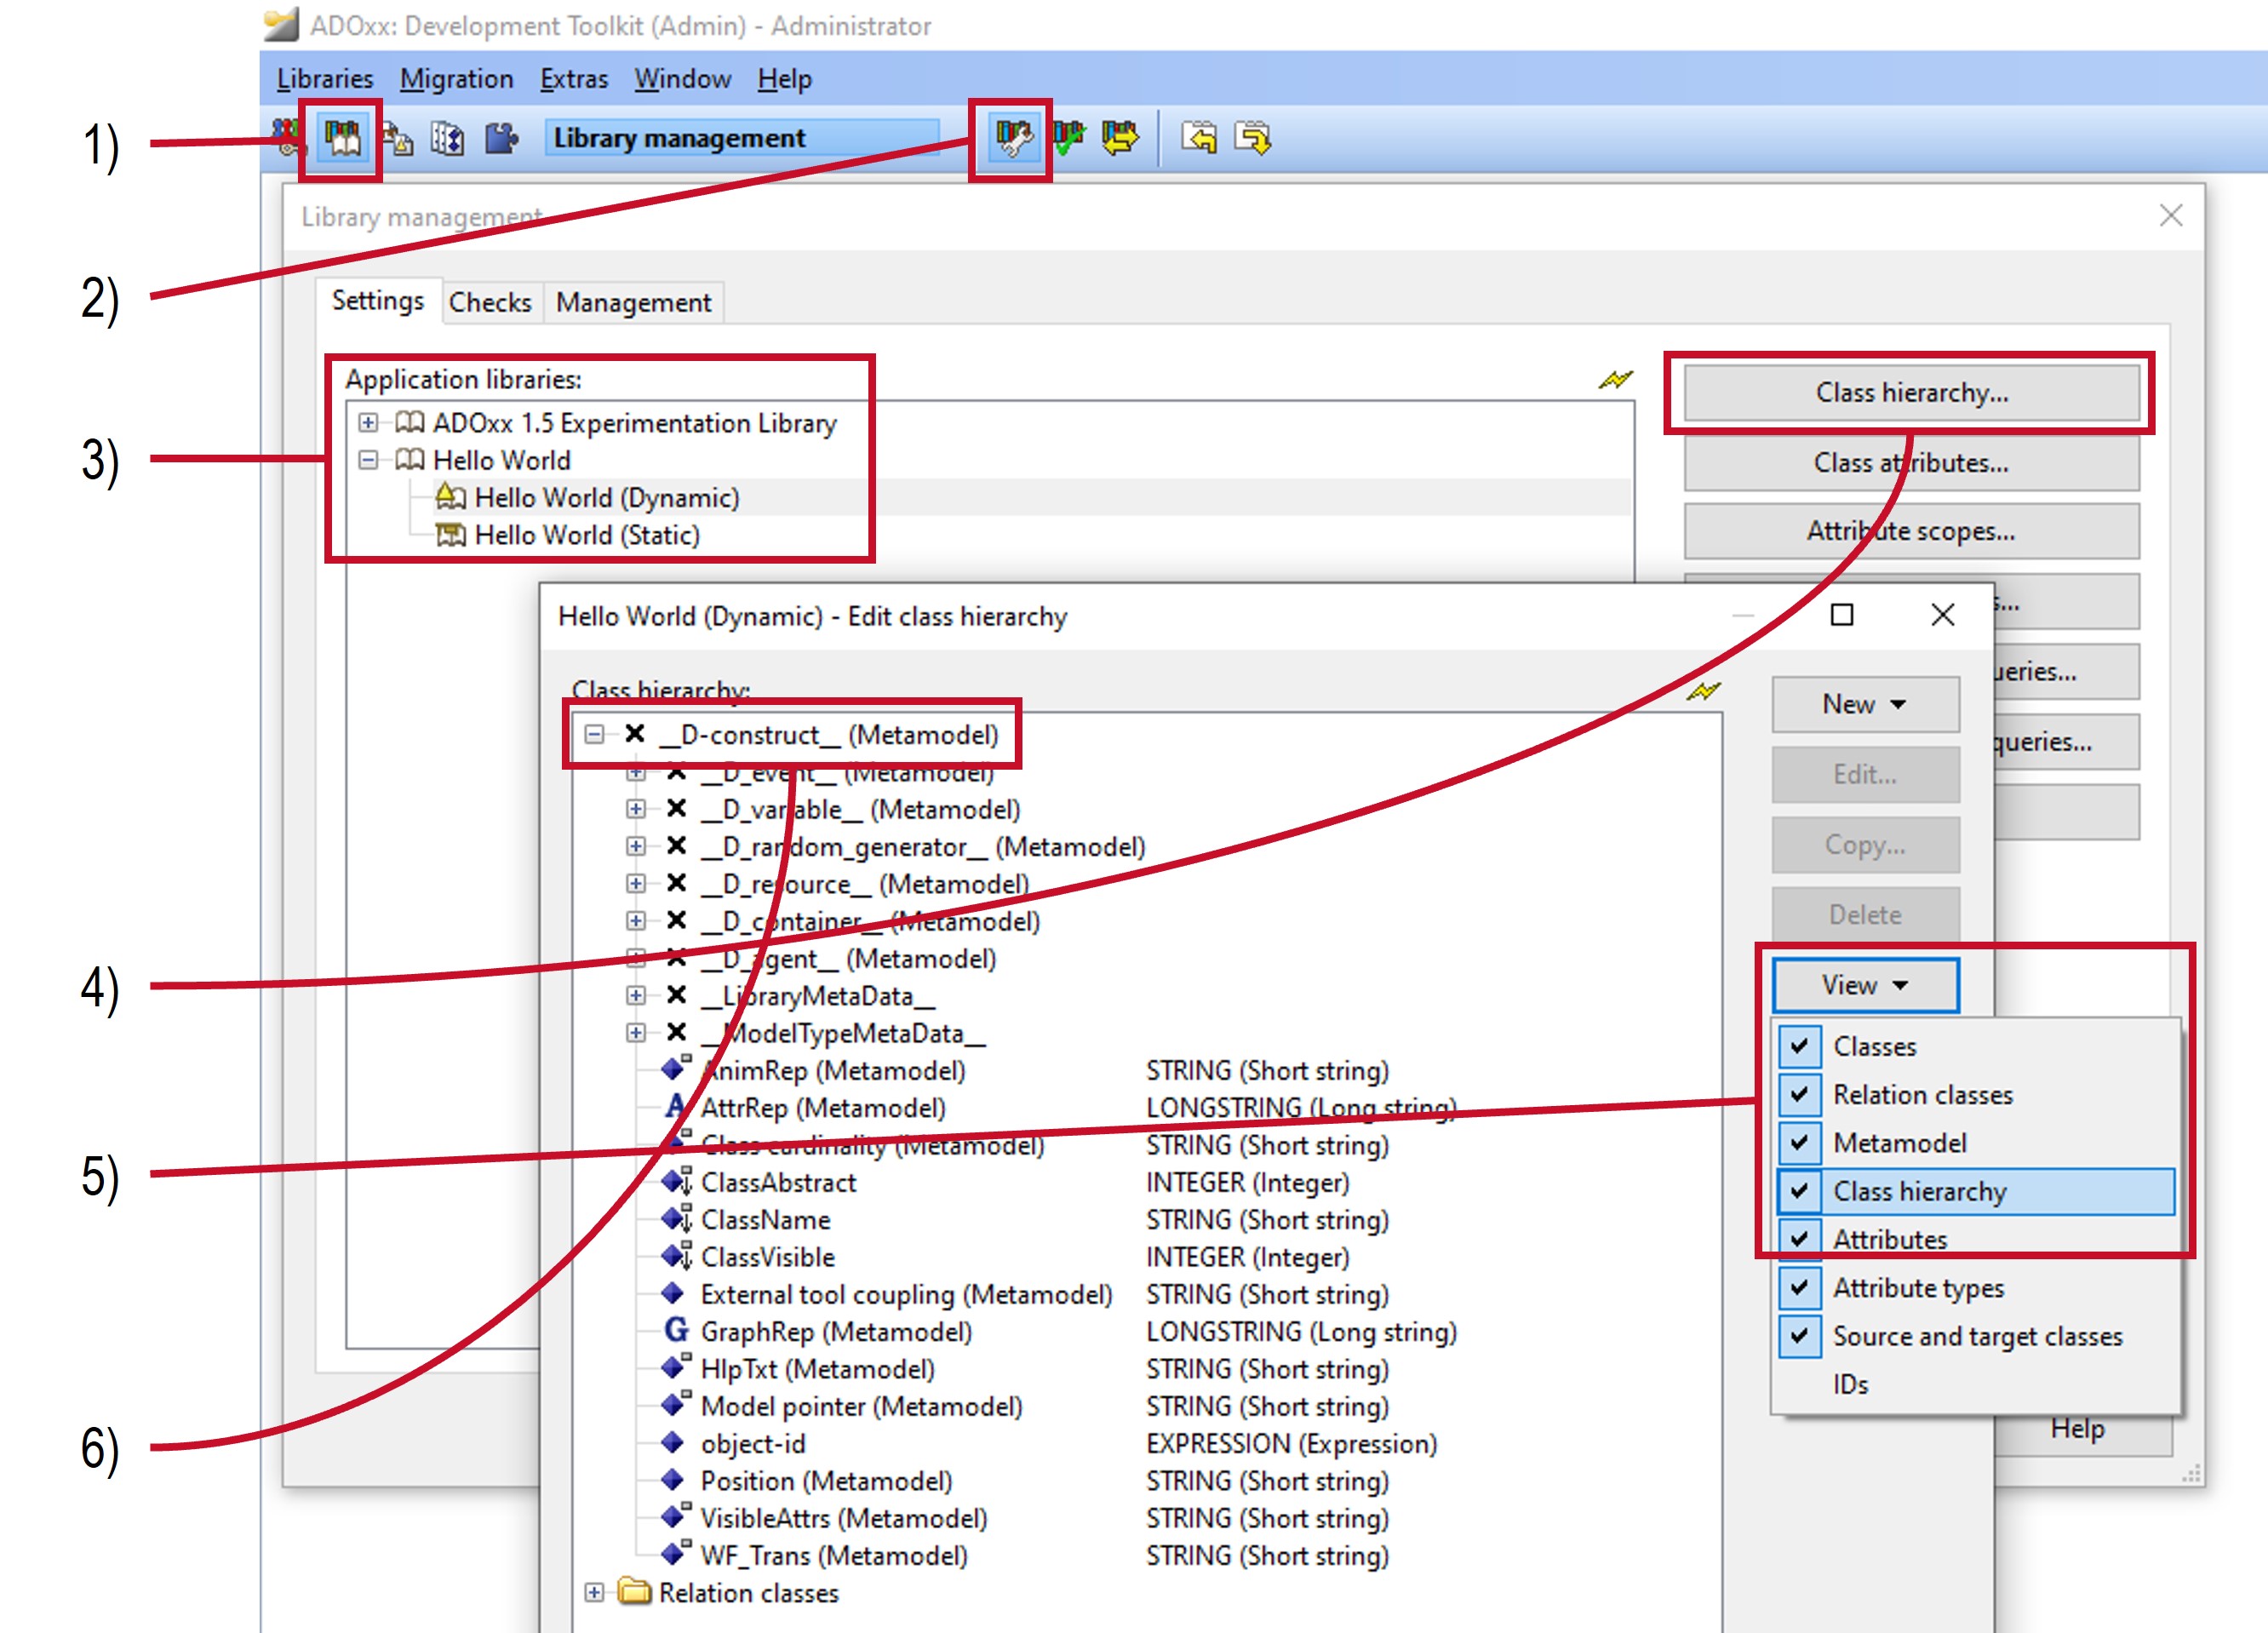
First it is necessary to open the class-hierarchy dialog for the library:
- Select the Library management component in the Development Toolkit.
- Select Libraries -> Settings... in the menu or the
 Settings icon in the quick access bar.
 - Open the "Hello World" library by selecting the
 icon next to it and select the "Hello World (Dynamic)" library.
 - Select the Class hierarchy... button.
- Under View activate both Metamodel and Class hierarchy.
- Open the
__D-construct__class by selecting the icon next to it.
Create Hello and World Classes
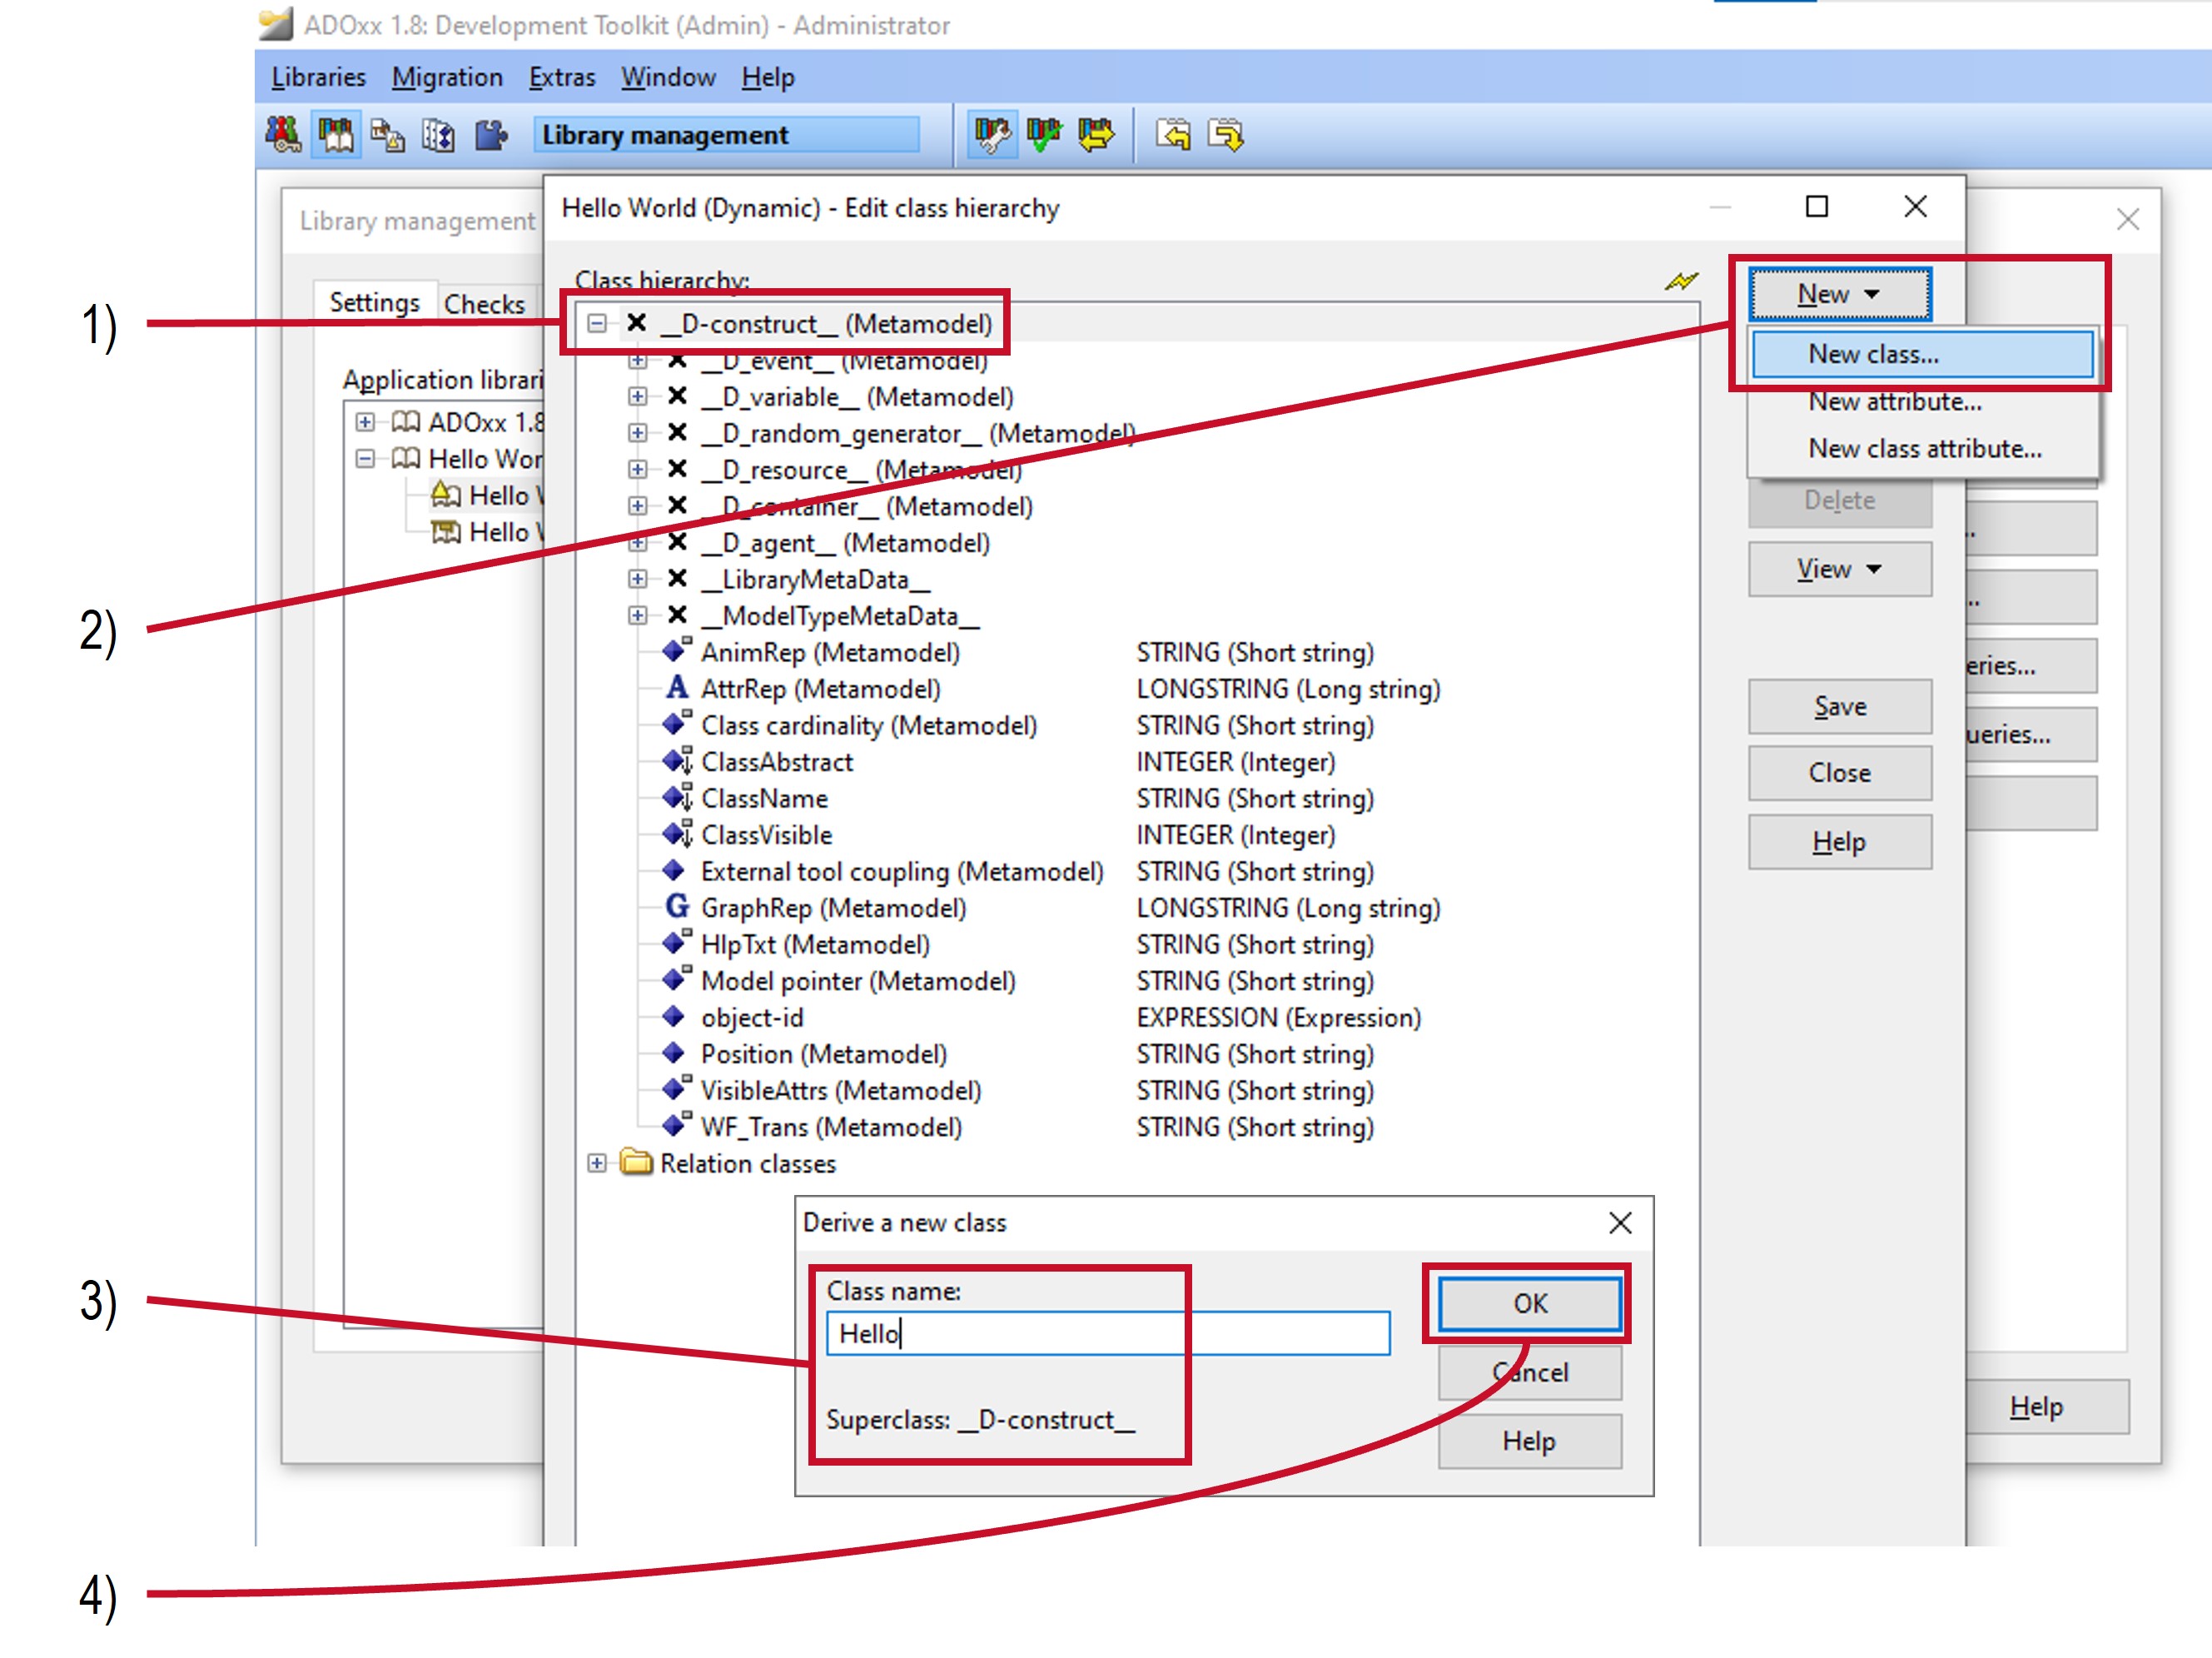
Create the two classes through the class-hierarchy dialog:
- Select the
__D-construct__class. - Select New -> New class... on the right side of the dialog.
- Enter
Helloas the class name.__D-construct__should be listed under Superclass. - Select Ok.
- Select the
__D-construct__class again. - Select New -> New class... on the right side of the dialog.
- Enter
Worldas the class name.__D-construct__should be listed under Superclass. - Select Ok.
For more details on classes see the classes page.
Specify Hello and World Notations
For the classes to be visible it is necessary to specify their graphical representation, which is achieved through the class-hierarchy dialog:
- Open the
Helloclass by selecting the icon next to it. - Double click on the
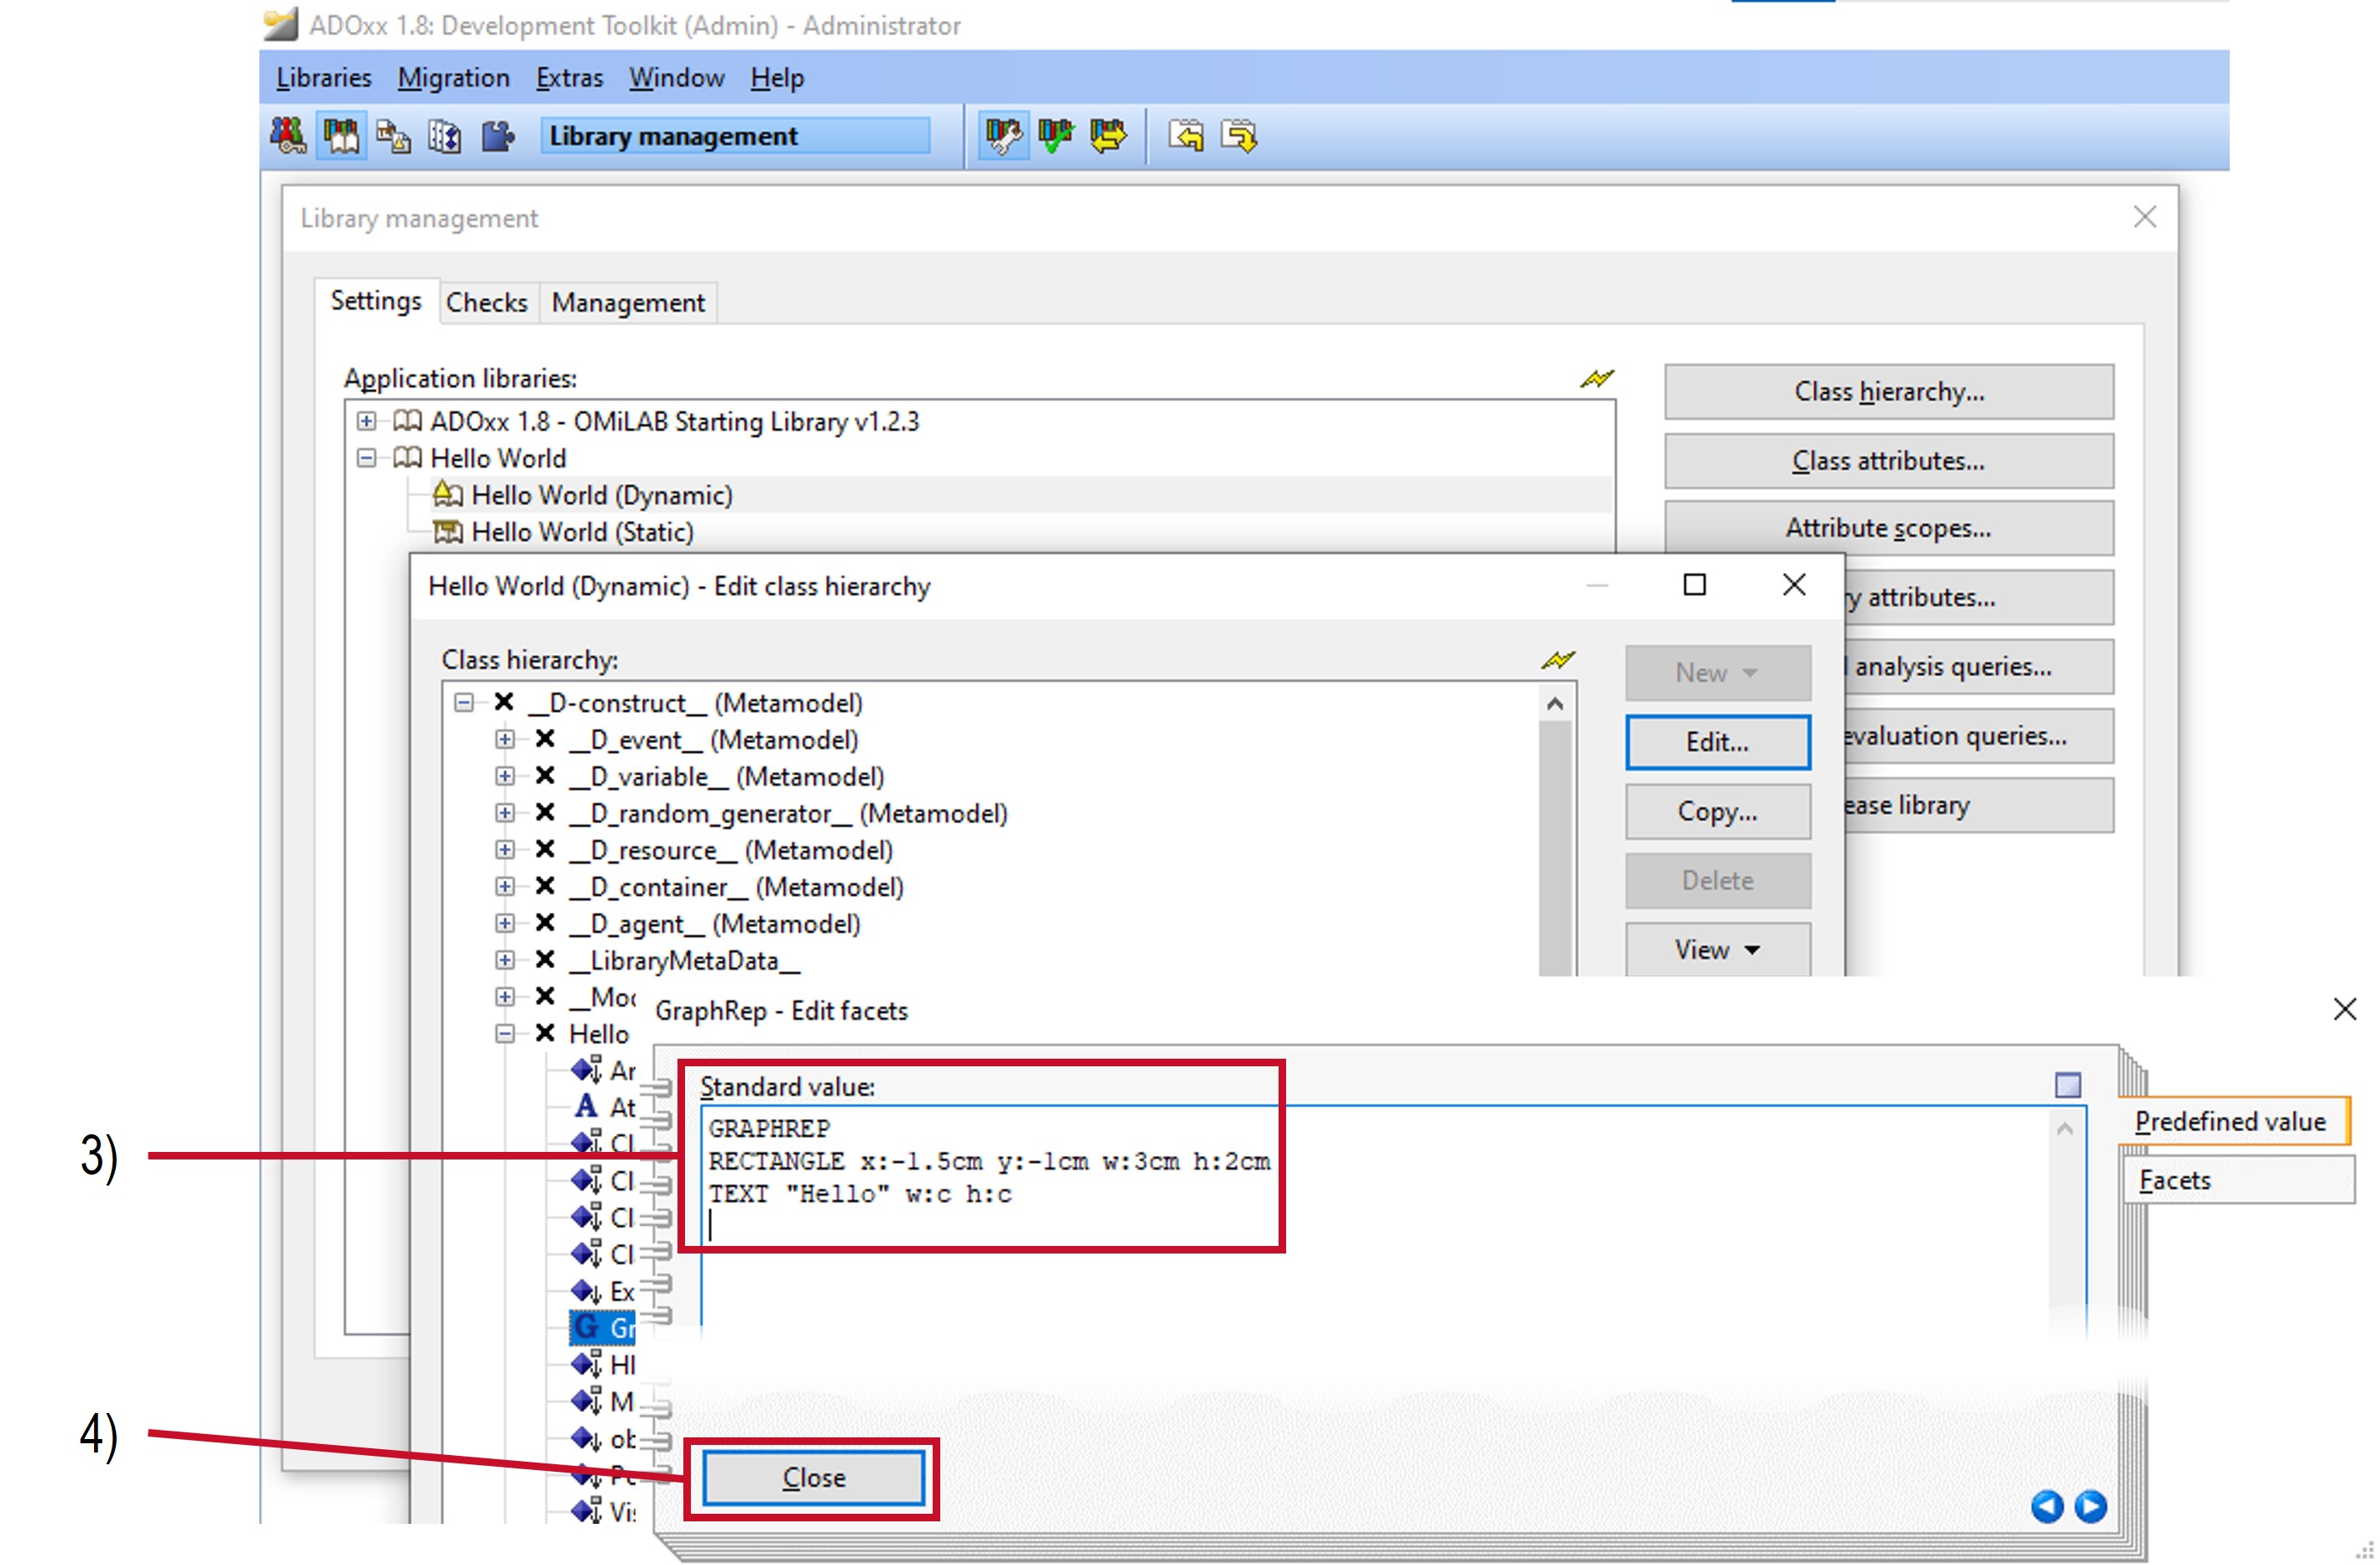
GraphRepattribute underneath theHelloclass. - Enter the following value for Standard value:leo
GRAPHREP RECTANGLE x:-1.5cm y:-1cm w:3cm h:2cm TEXT "Hello" w:c h:c - Select Close
- Open the
Worldclass by selecting the icon next to it. - Double click on the
GraphRepattribute underneath theWorldclass. - Enter the following value for Standard value:leo
GRAPHREP RECTANGLE x:-1.5cm y:-1cm w:3cm h:2cm TEXT "World" w:c h:c - Select Close
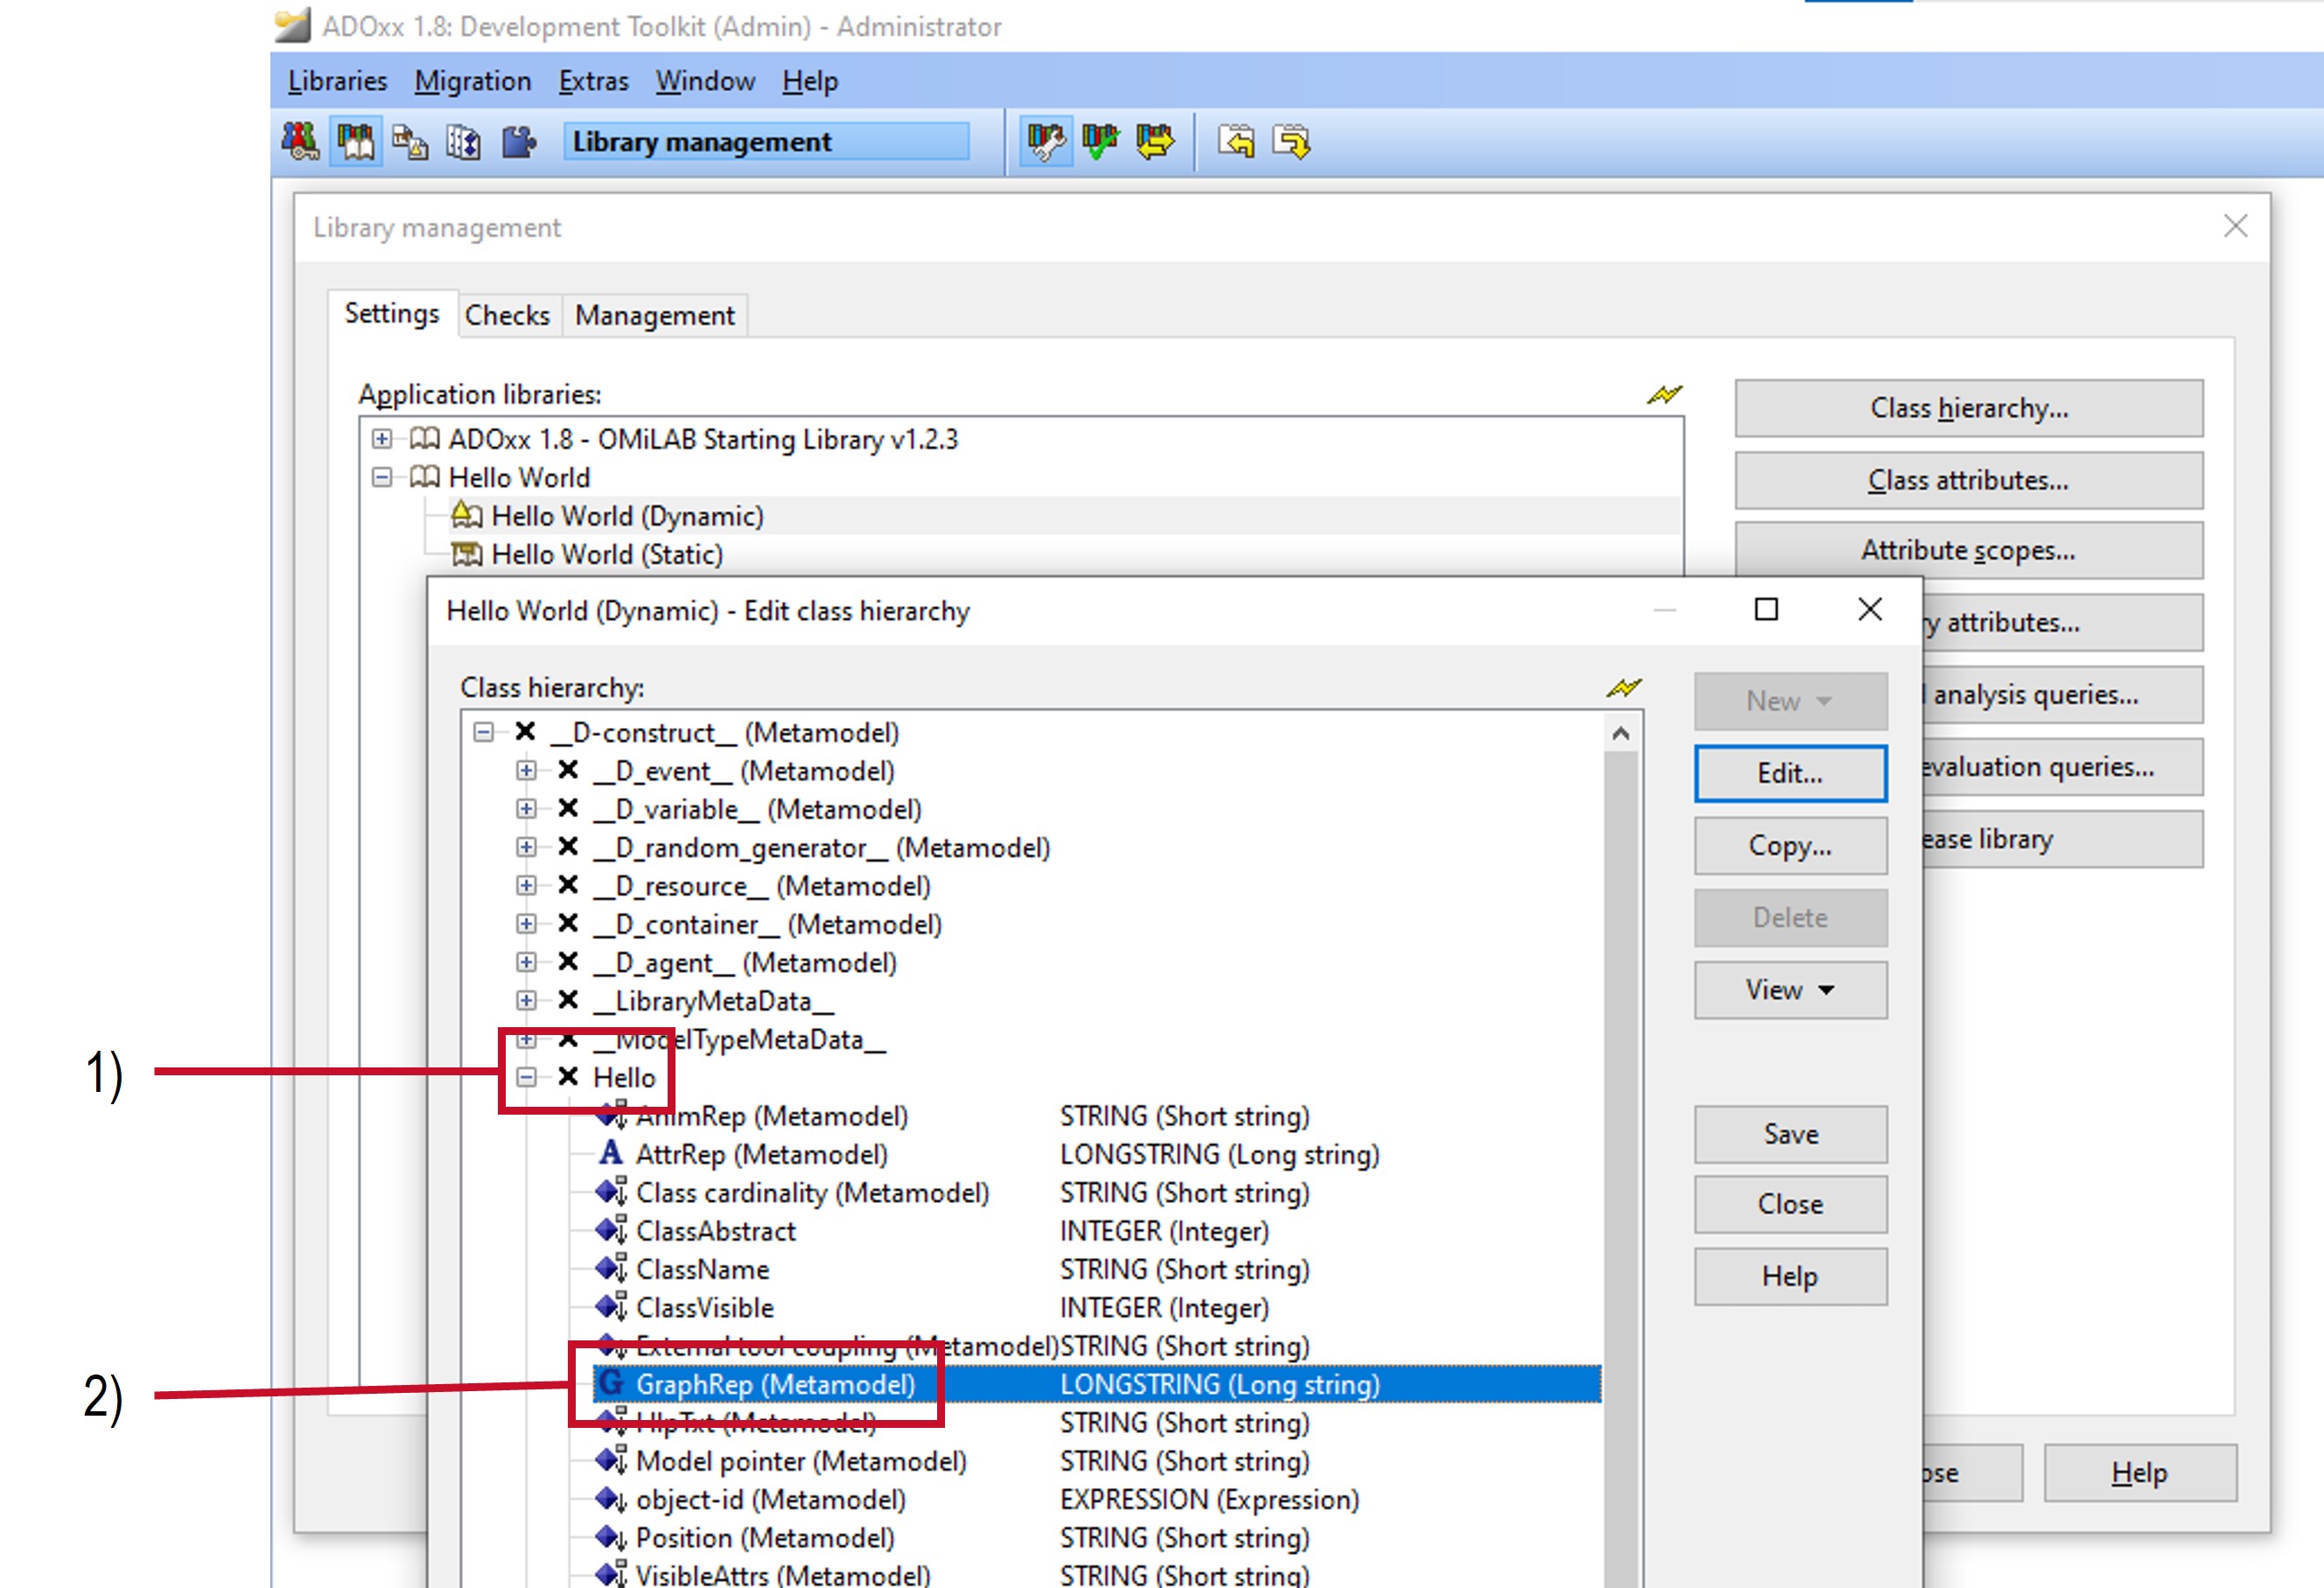
Selecting the correct GraphRep attribute
Be careful to select the right GraphRep attribute: The attributes at the end of the list belong to __D-construct__, not World! Use the lines coming from the icons of the attribute to determine what class they belong to.
For more details on the notation of classes see the the special attribute GraphRep.
Create HelloAnything Relation Class
To create a relation class perform the following steps in the class-hierarchy dialog:
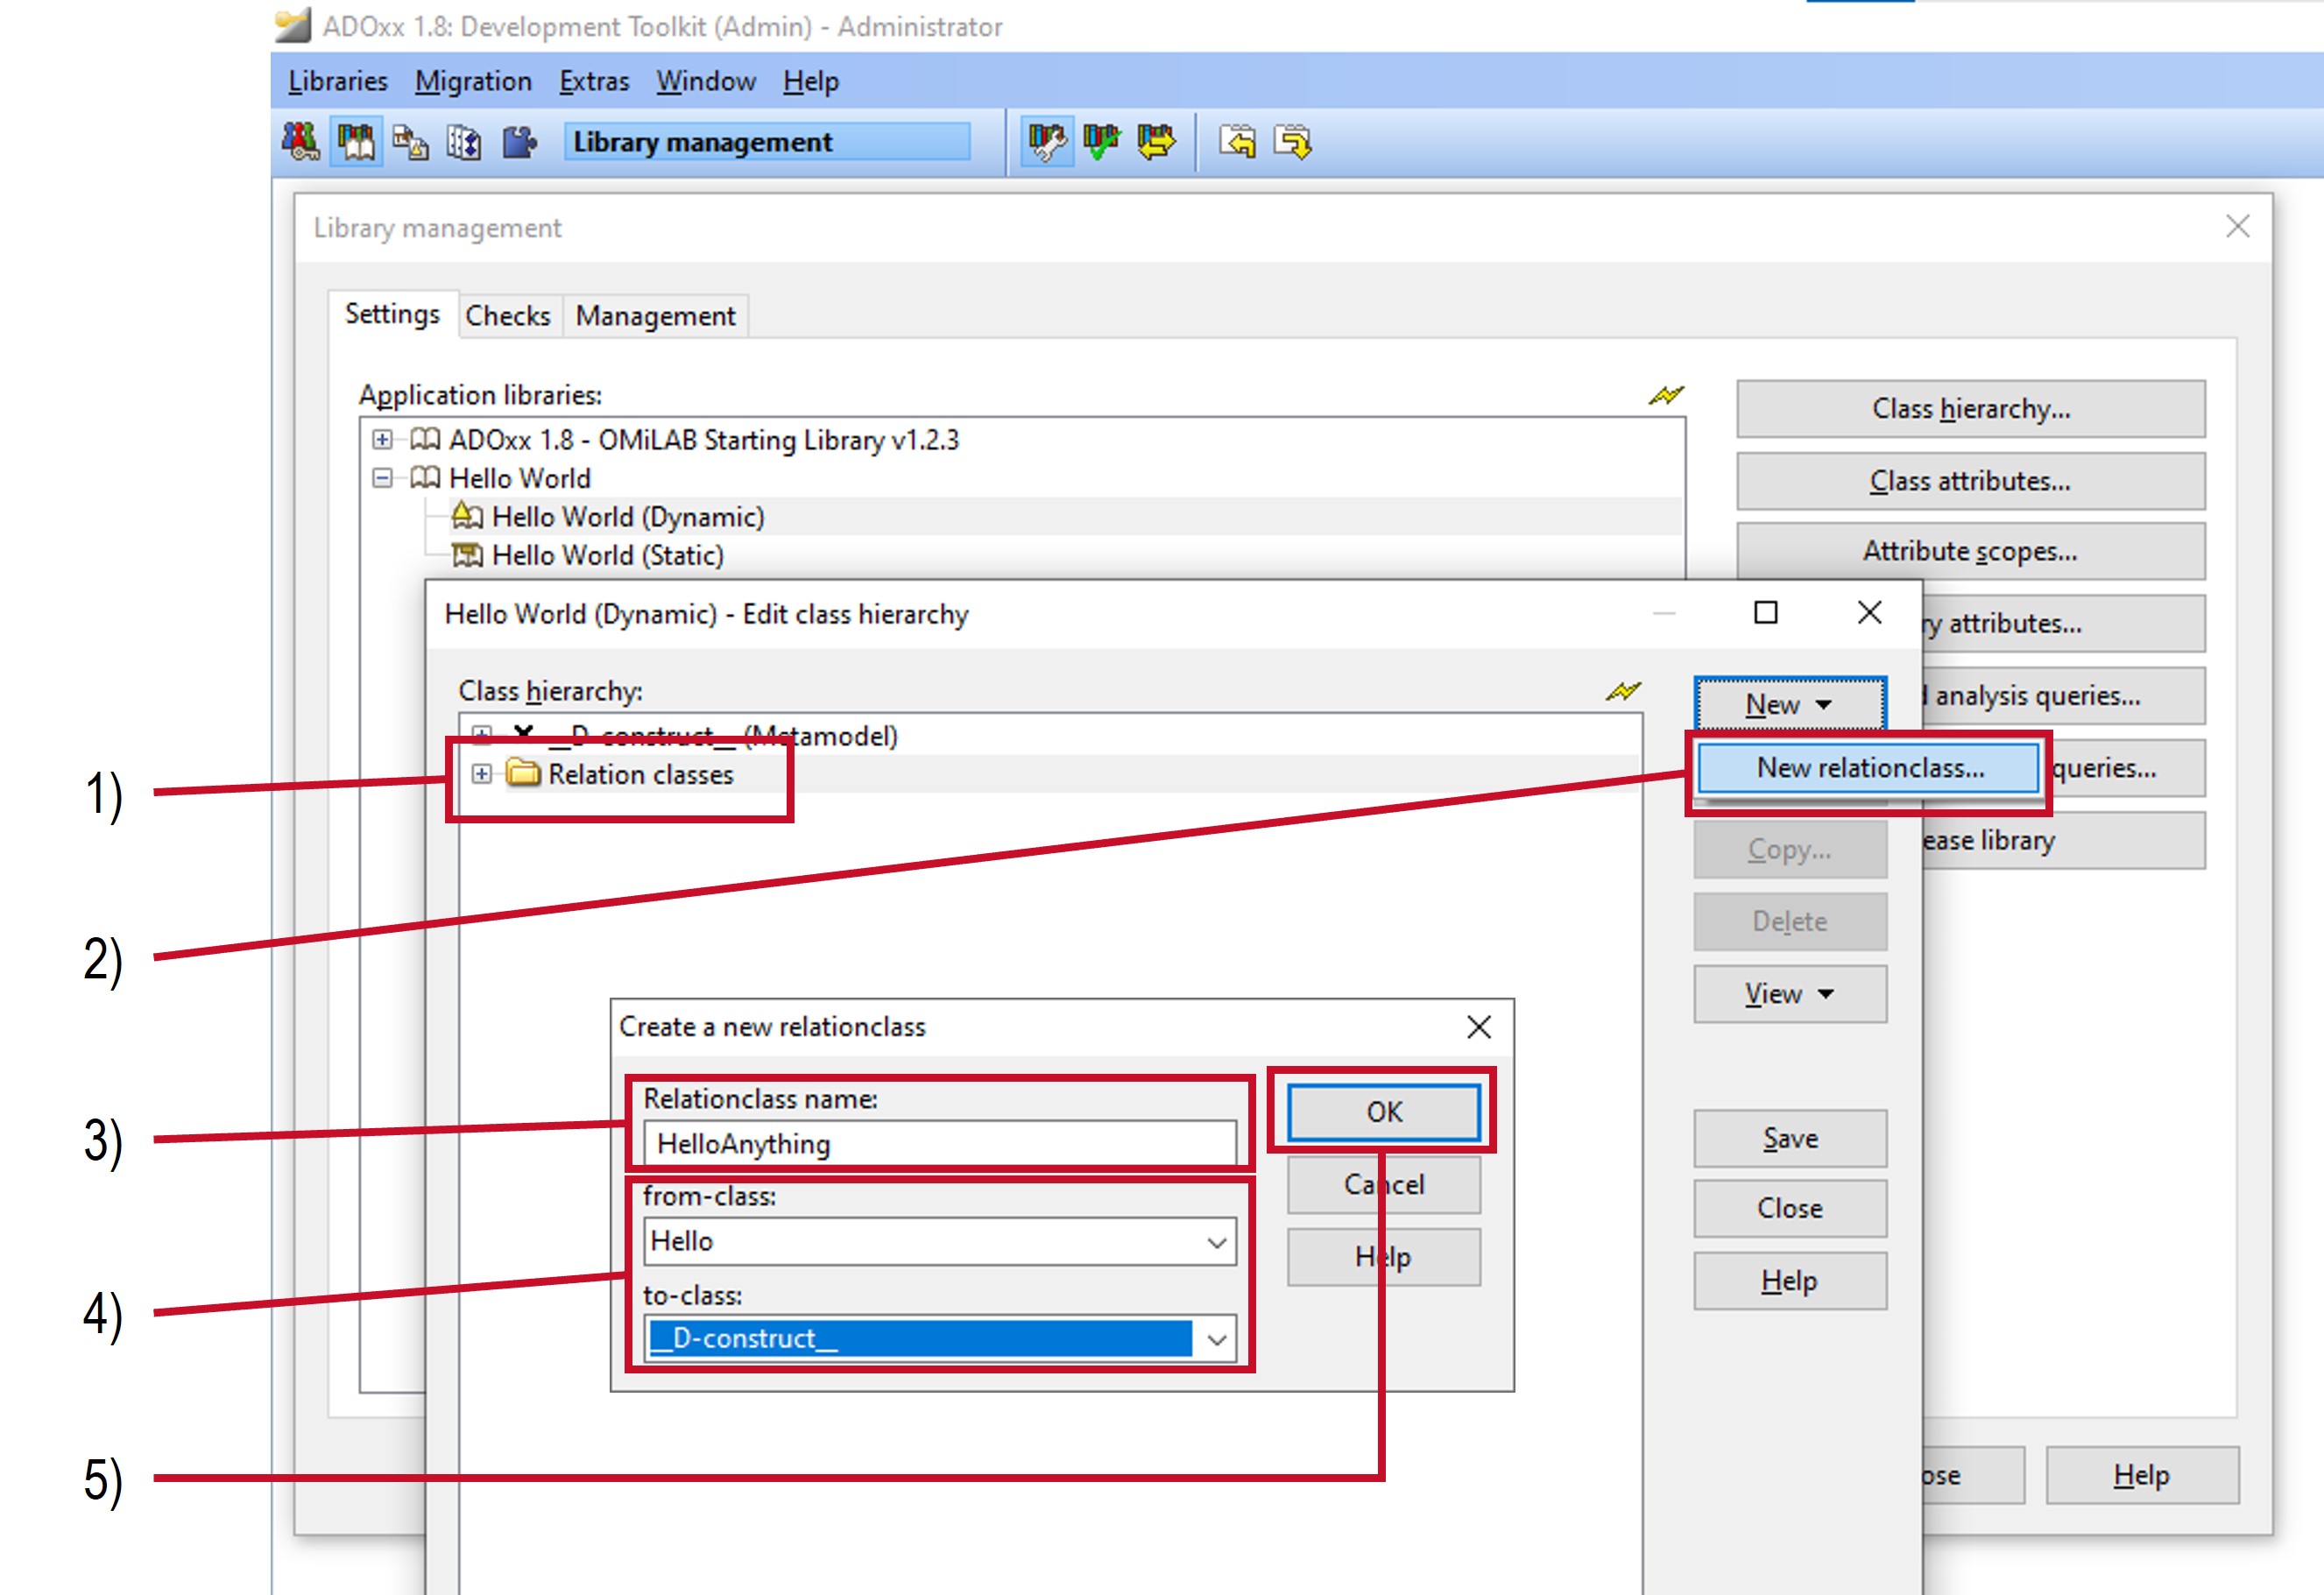
- Select
Relation classesat the bottom of the class-hierarchy dialog. - Select New -> New relationclass... on the right side of the dialog.
- Enter
HelloAnythingas the class name. - For from-class select
Helloand for to-class select__D-construct__. - Select Ok
For more details on classes see the classes page.
Specify HelloAnything Notations
Relation classes have a default notation that is used if none is specified. The default notation is a thin black line, which is also the desired notation for the example.
The notation could be changed similar to the Hello and World classes by editing the GraphRep attribute.
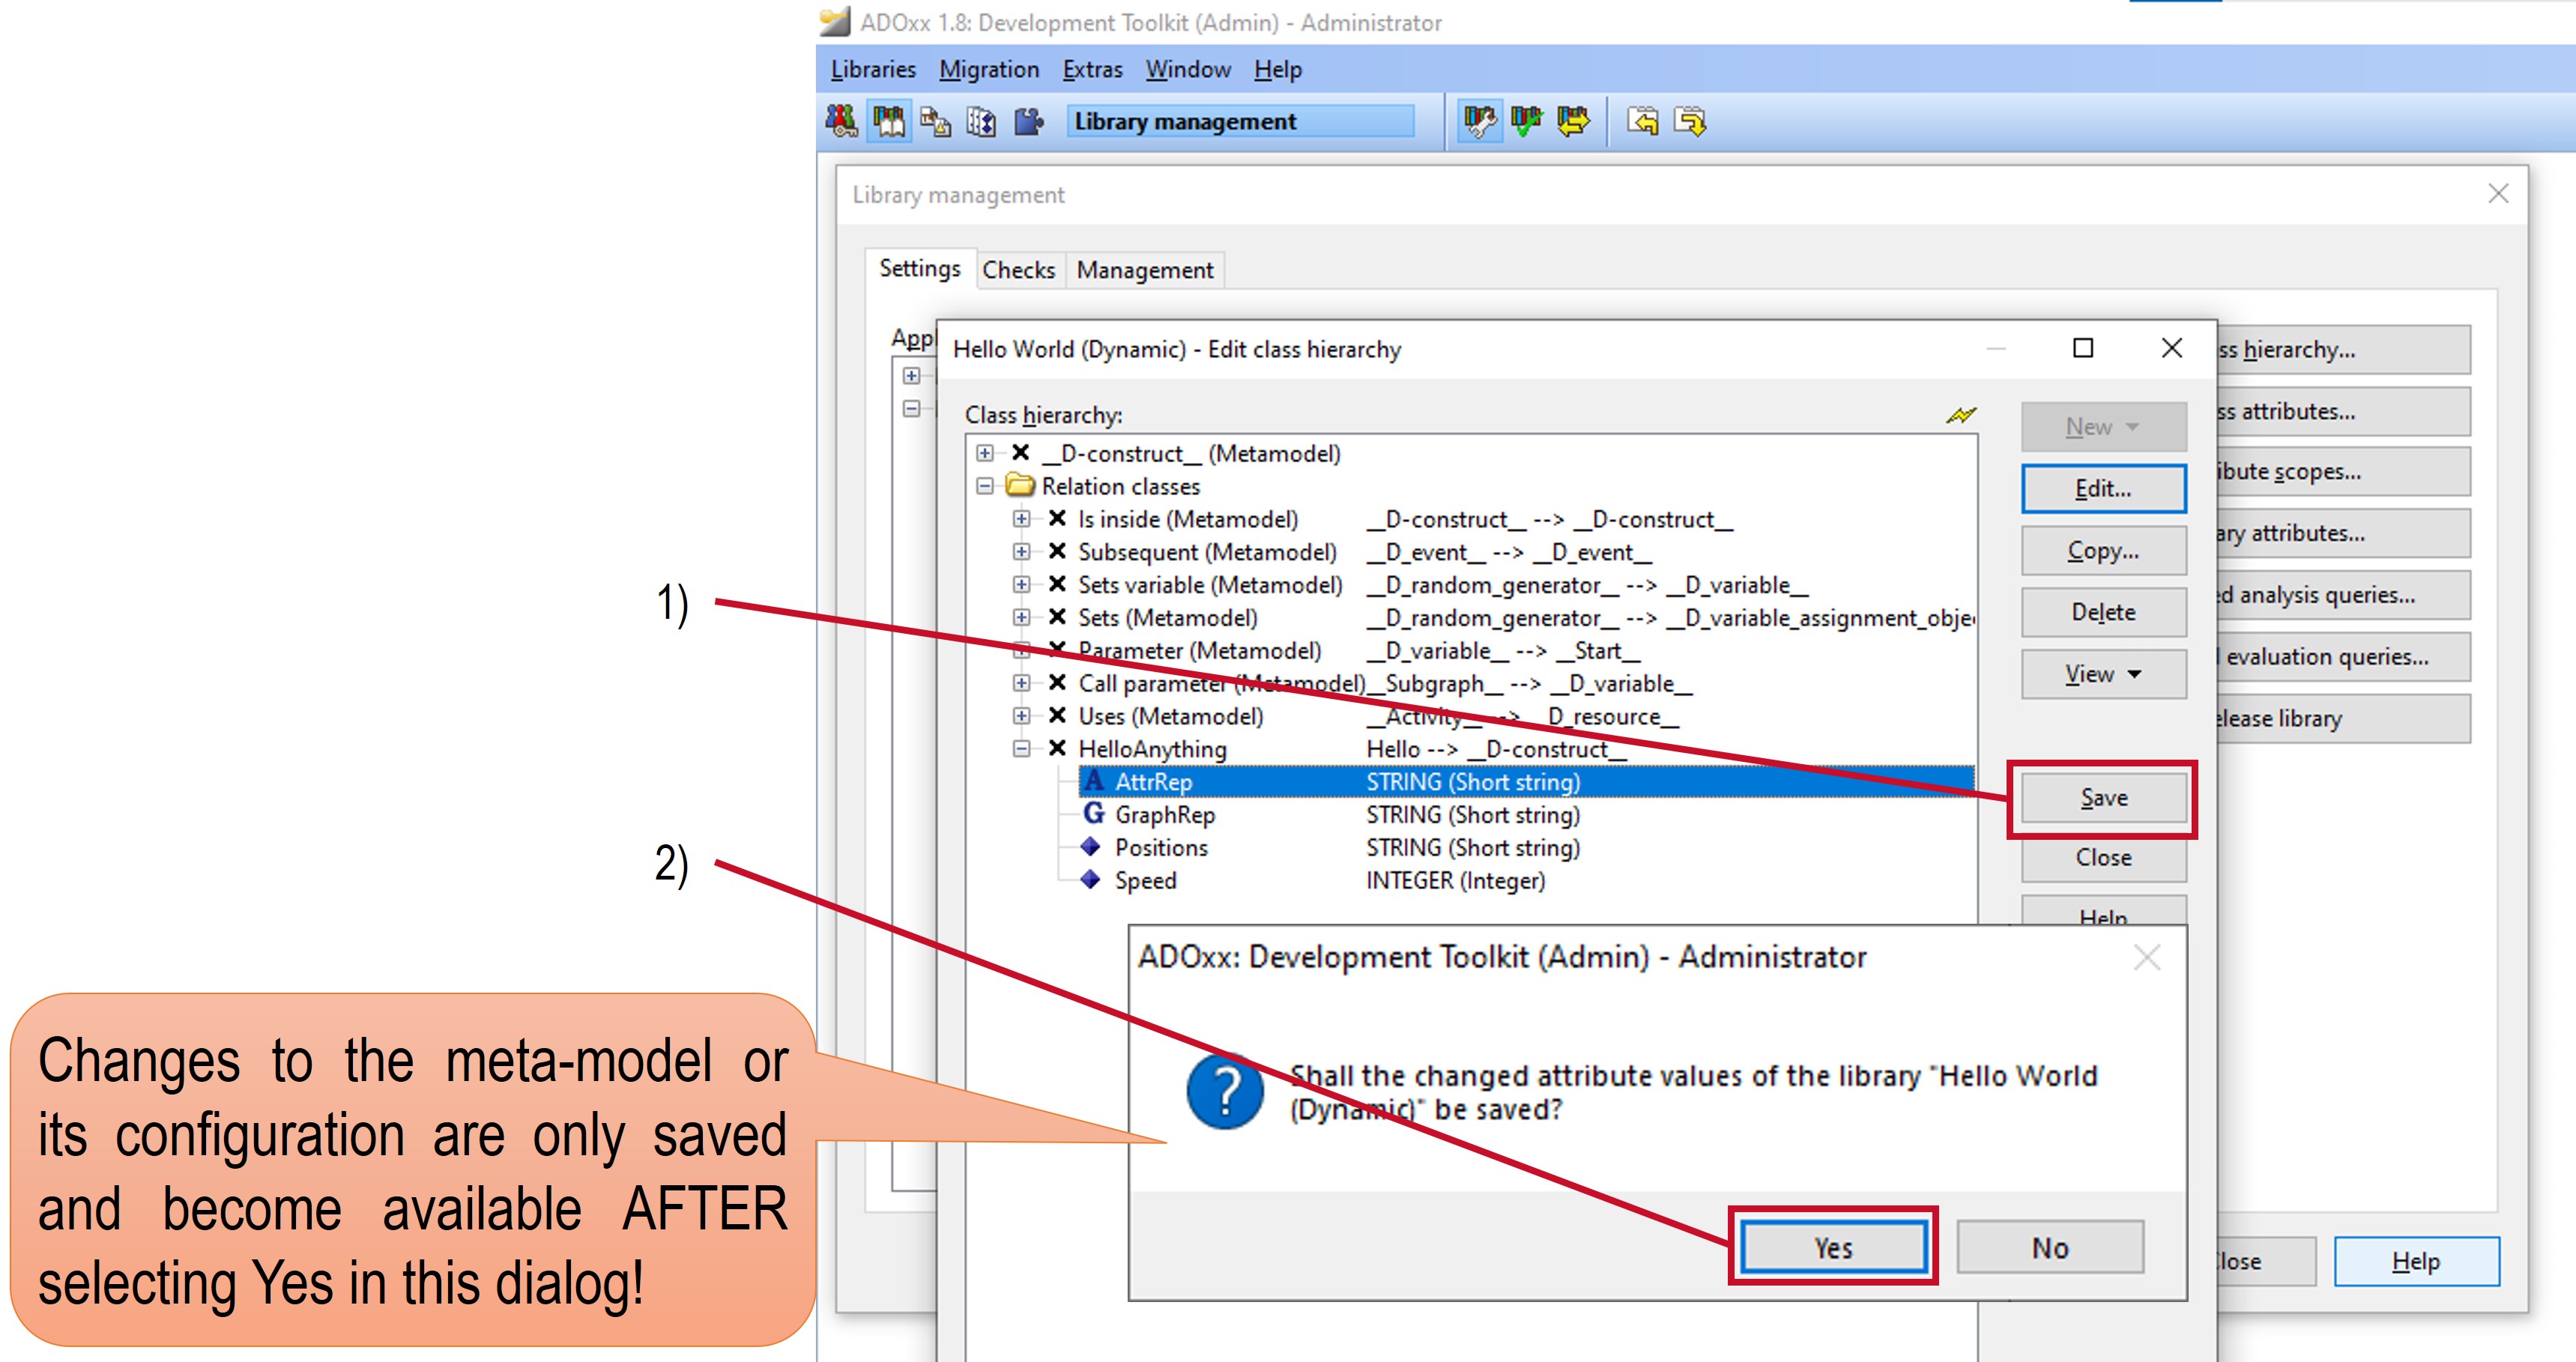
Save Changes to Class-Hierarchy
Change are not stored until they are explicitly saved. To save changes in the class-hierarchy simply select the Save button. This will perform checks and inform about any issues that were encountered. Afterwards a dialog asks whether the changes shall be saved. Select Yes to save the changes. After saving the library close the class-hierarchy dialog by selecting Close.
When closing the class-hierarchy dialog via the Close button you also get the option to save or discard any changes after the dialog is closed.
Specify Hello World Model Type
Creating and configuring model types is handled through the Modi library attribute. Library attributes are accessible through the Library settings dialog. If it has been accidentally closed, then it can be opened again by following the steps:
- Select the Library management component in the Development Toolkit.
- Select Libraries -> Settings... in the menu or the Settings icon in the quick access bar.
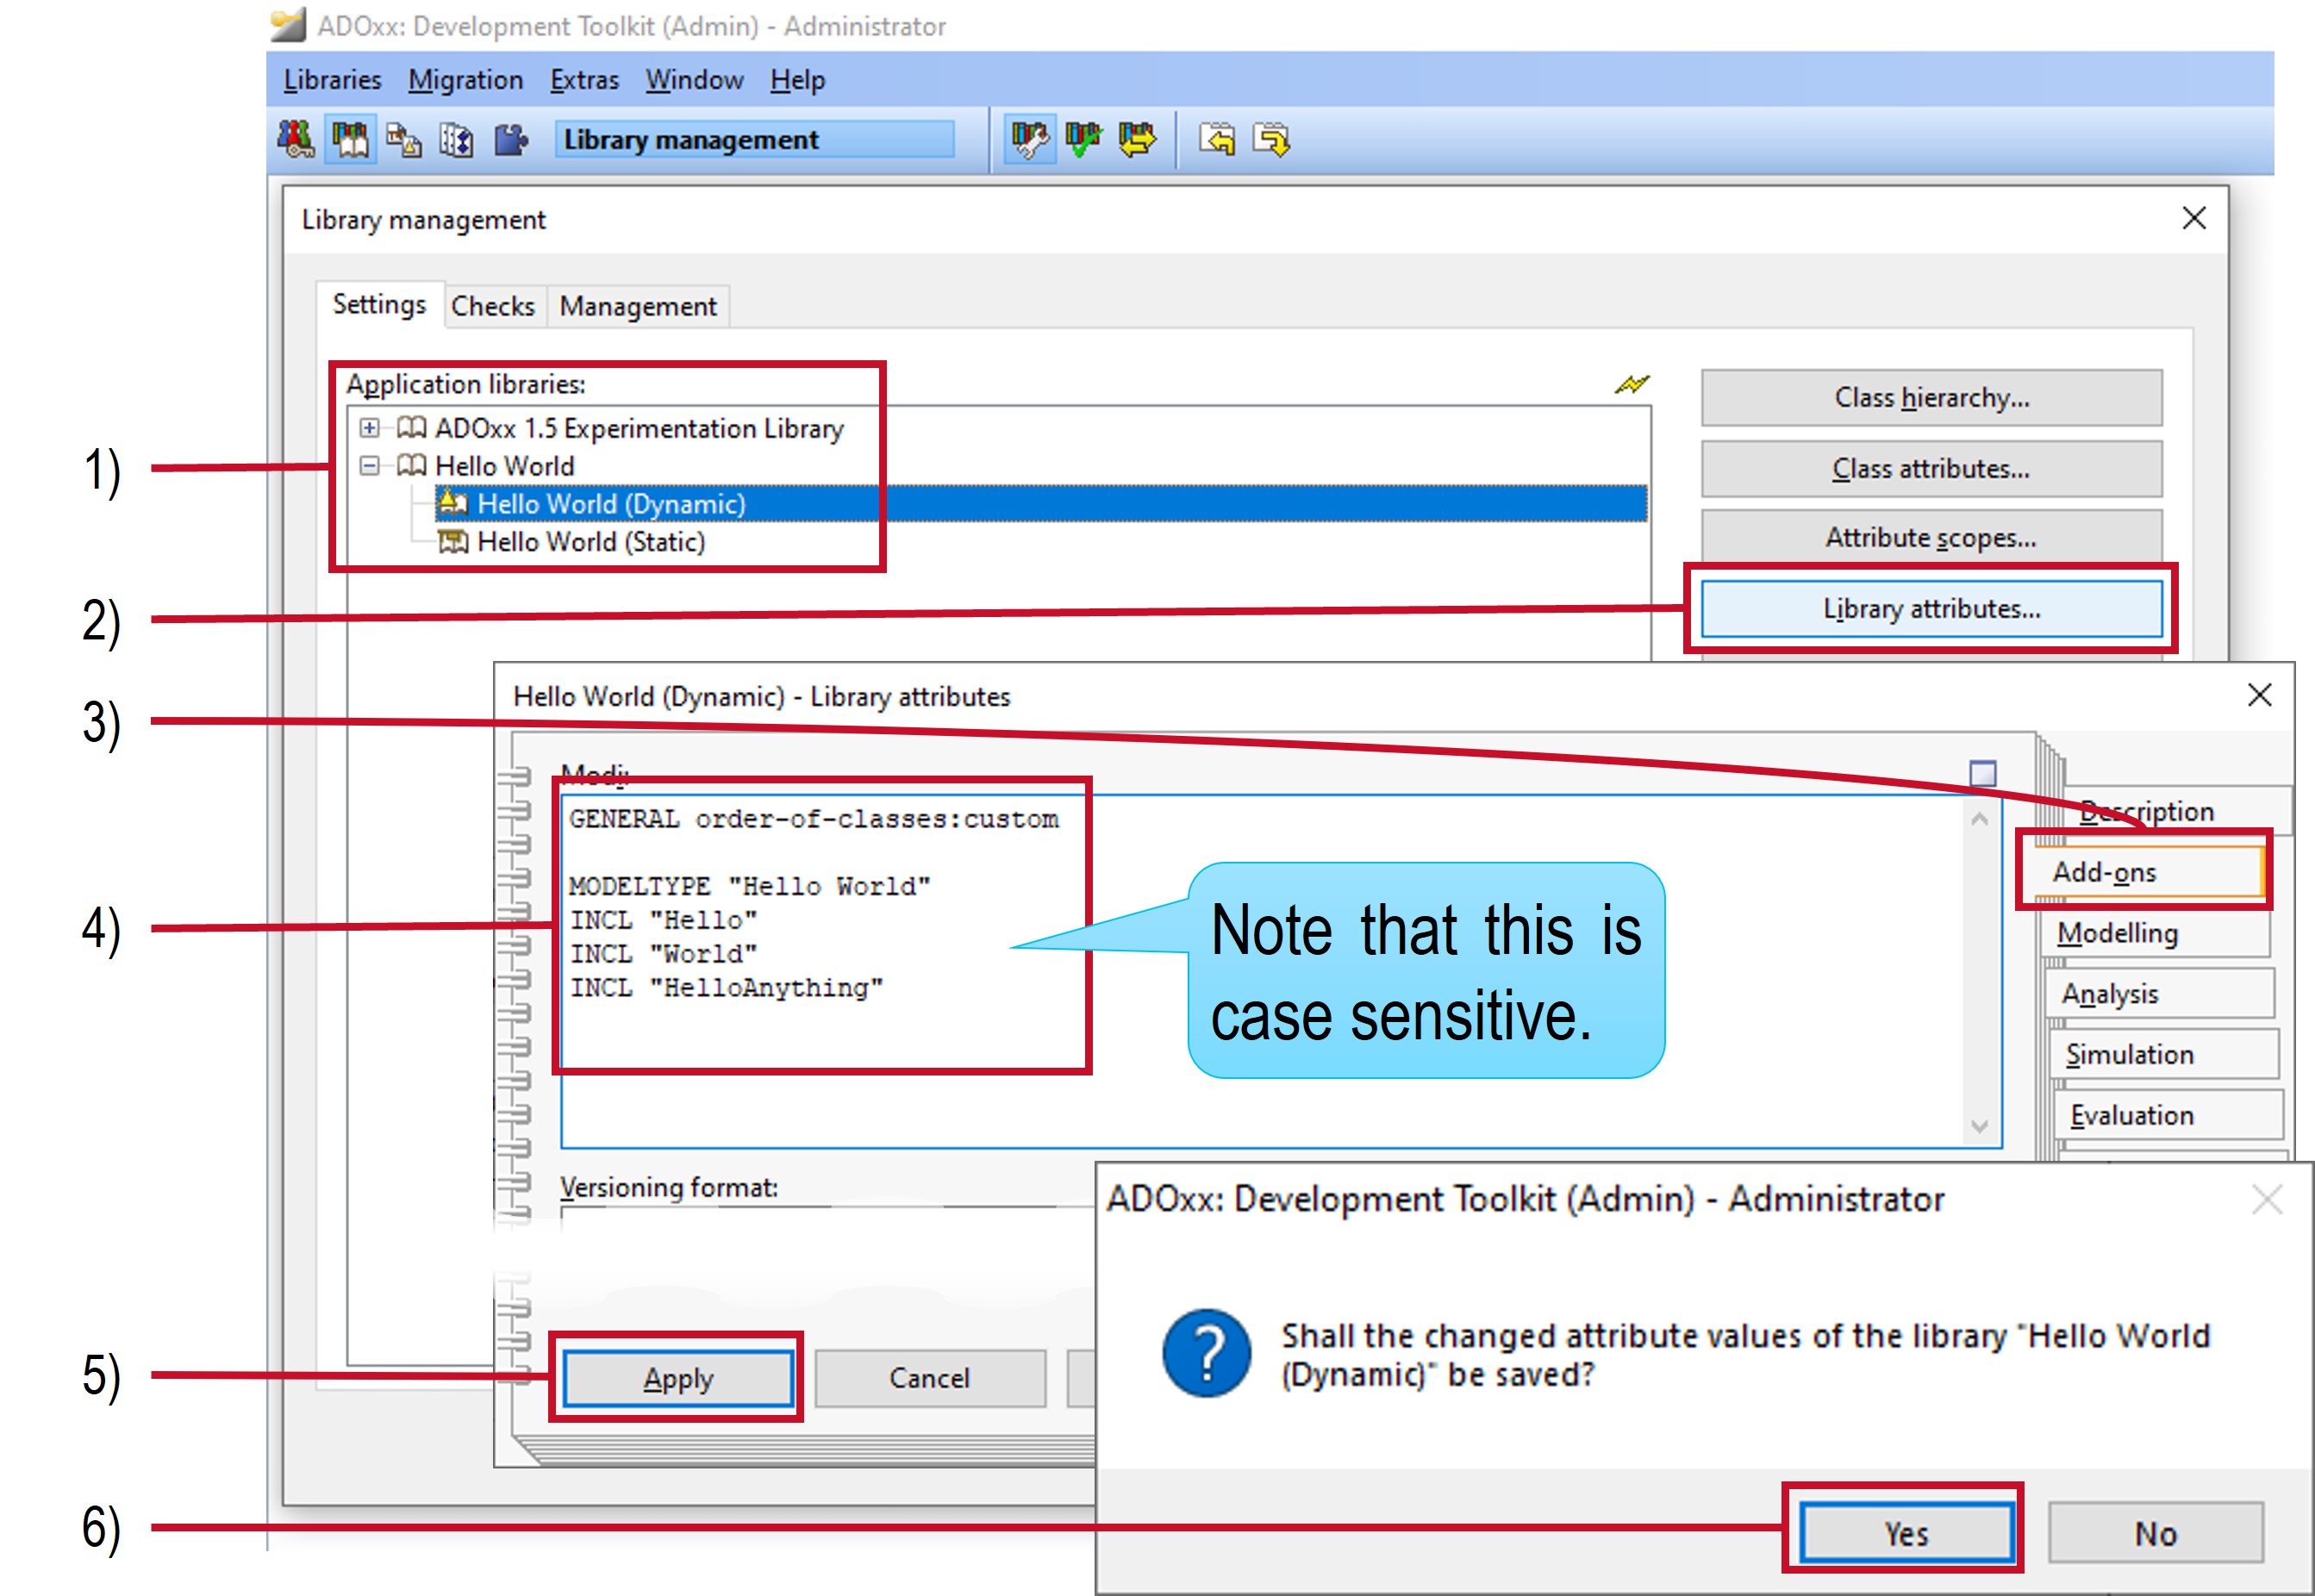
To specify the model type:
- Open the "Hello World" library if necessary by selecting the icon next to it and select the "Hello World (Dynamic)" library.
- Select the Library attributes... button.
- Select the Add-ons tab.
- Set the value of the
Modiattribute to:leoGENERAL order-of-classes:custom MODELTYPE "Hello World" INCL "Hello" INCL "World" INCL "HelloAnything" - Select Apply at the bottom.
- When prompted whether the changed attribute values should be saved confirm with Yes.
Check the Result
The result from the changes to the library can be now used in the Modelling Toolkit. However, to see the result in the Modelling Toolkit it is first necessary to create an ADOxx user which has the library assigned.
Create Hello World User
To create a user for testing the Hello World library perform these steps in the Development Toolkit:
- If the Library management dialog is still open, then close it by selecting Close.
- Select the
 User management component.
 - Select User -> User list... in the menu or the
 User list icon in the quick access bar to open the User management - User list window.
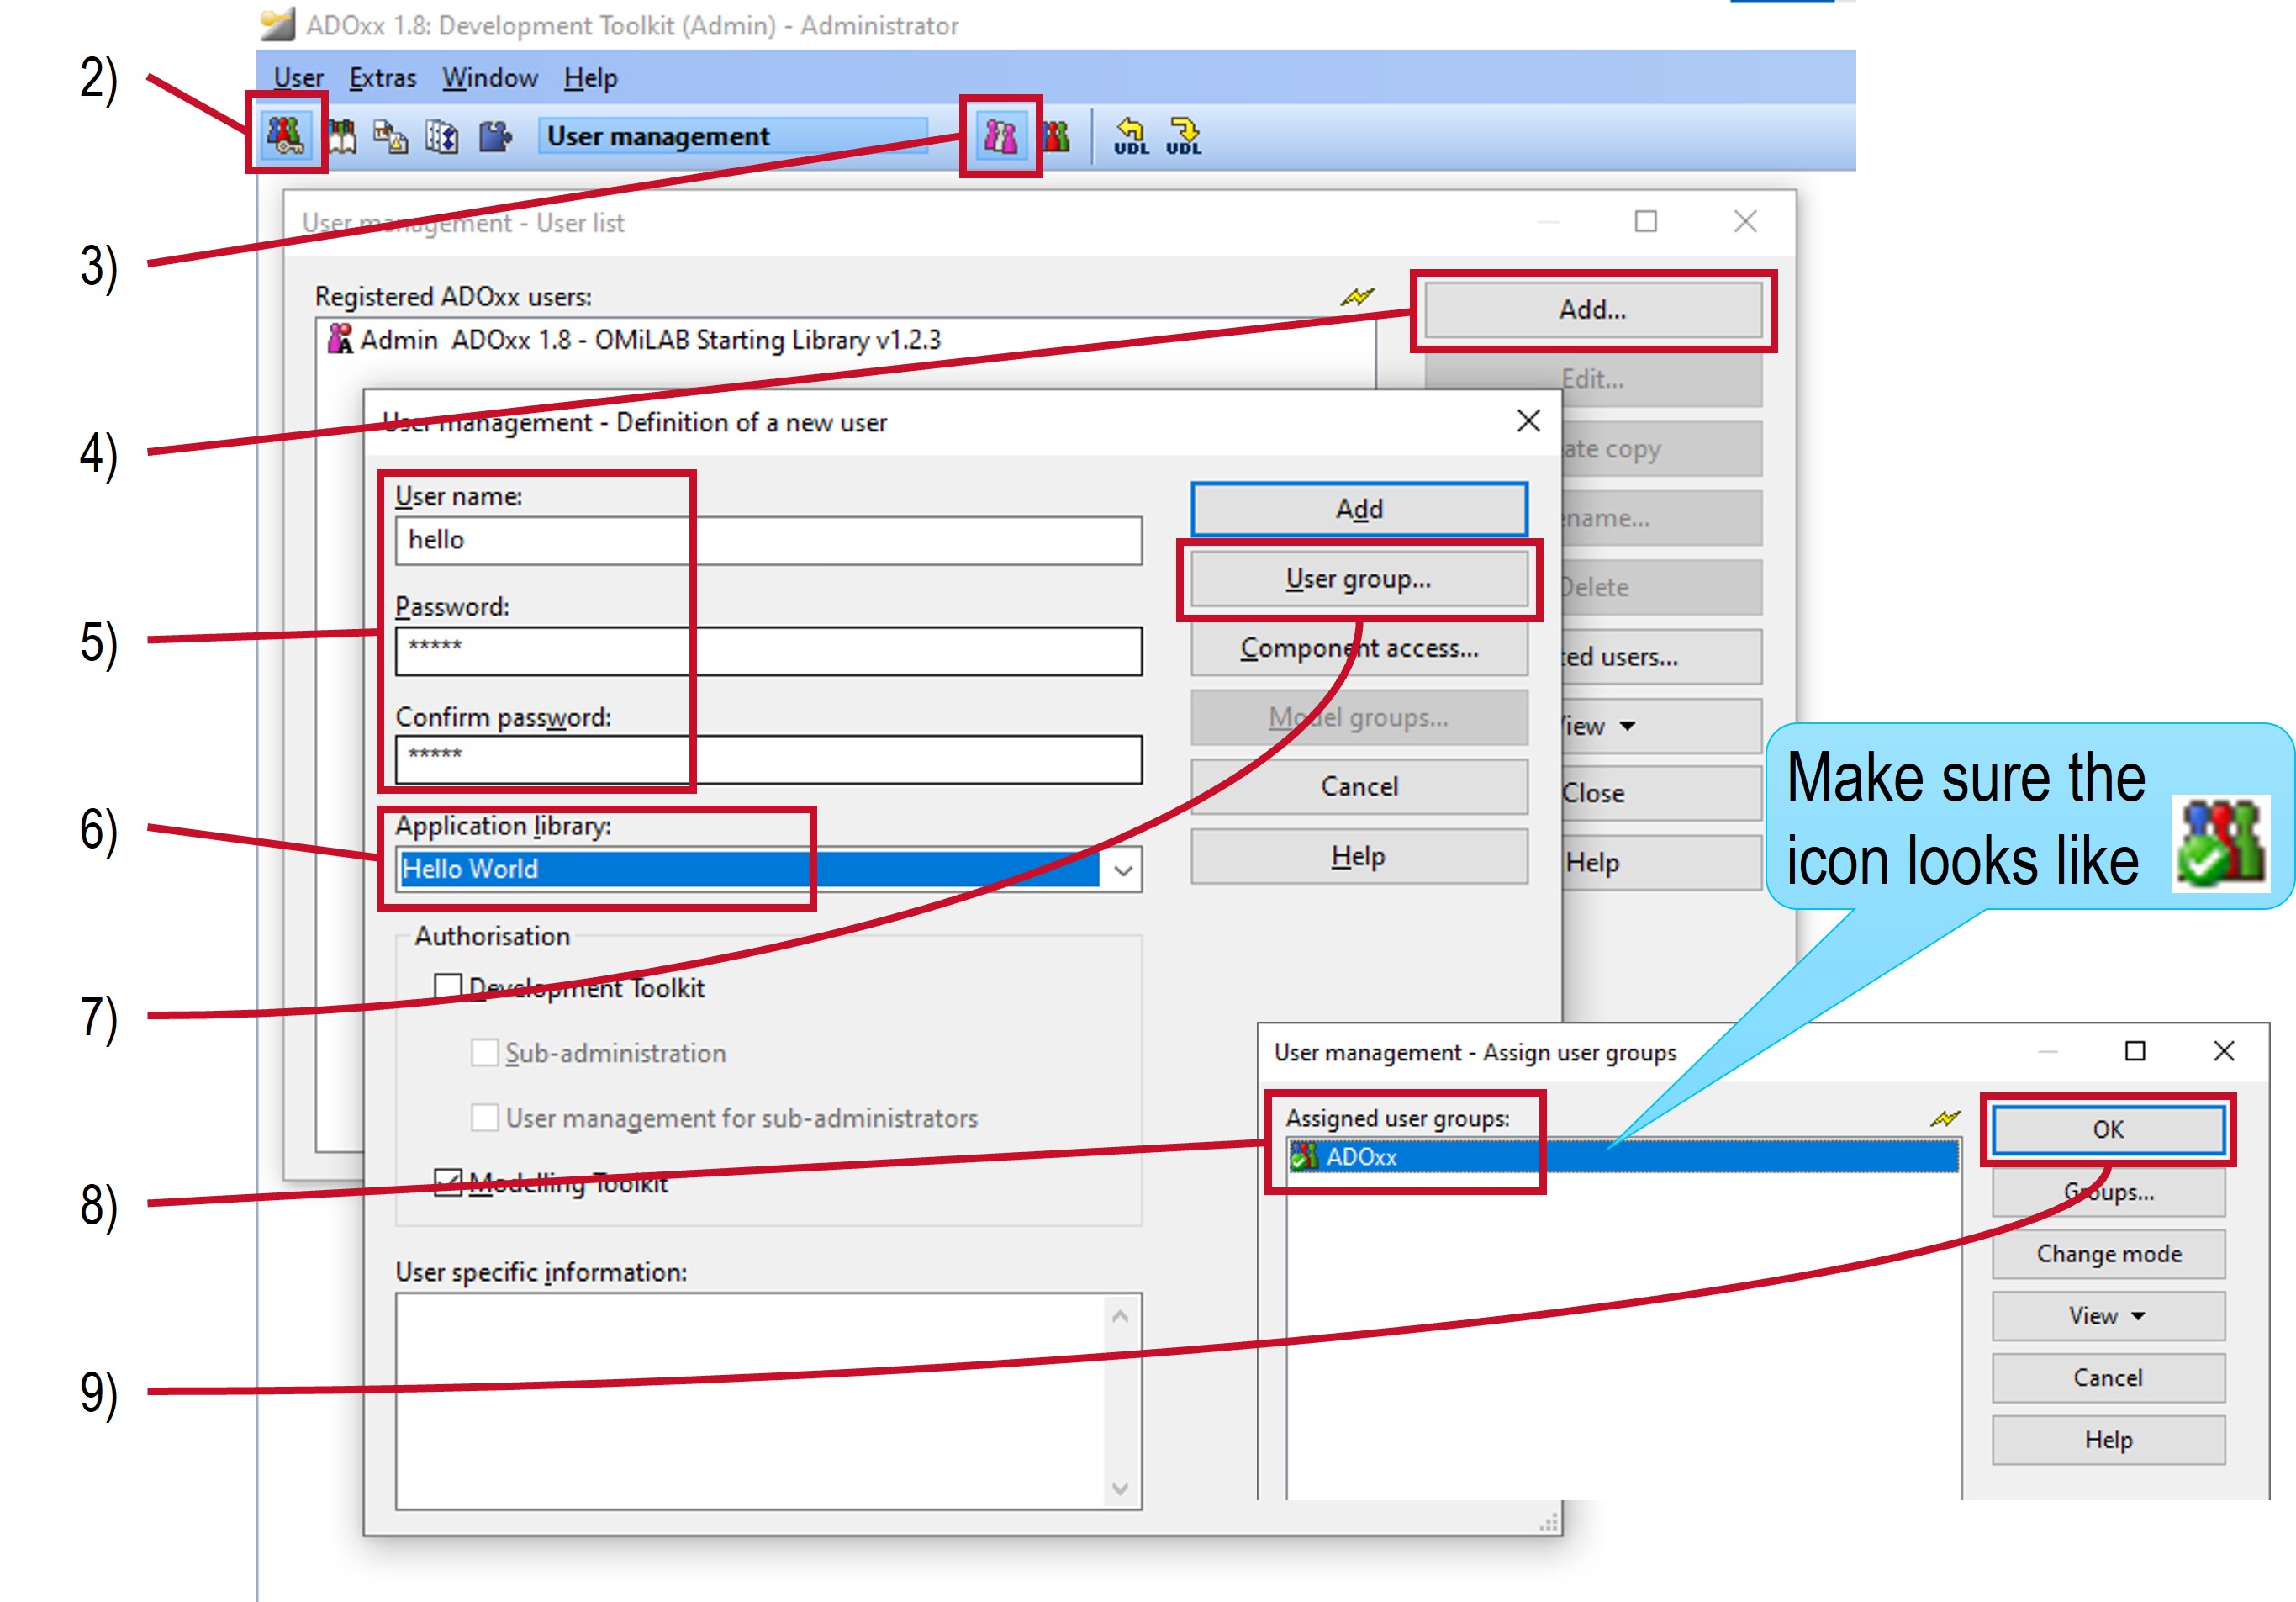
 - Select Add... to create a new user.
- Enter
hellofor the User name, Password and Confirm password. - For the Application library select
Hello World. - Select the User group... button on the right side.
- Clicking the small
 icon to the left of the
 ADOxxuser group. It should show an icon with a small green checkmark.
 - Confirm all the windows to close them (OK, Add, Close, Close).
Every ADOxx user is assigned to one specific Application Library which is loaded when logging into the Modelling Toolkit.
Create a Hello World Model
After a user has been created and assigned to the library the first Hello World model can be created by:
- Start the Modelling Toolkit and log in the User name
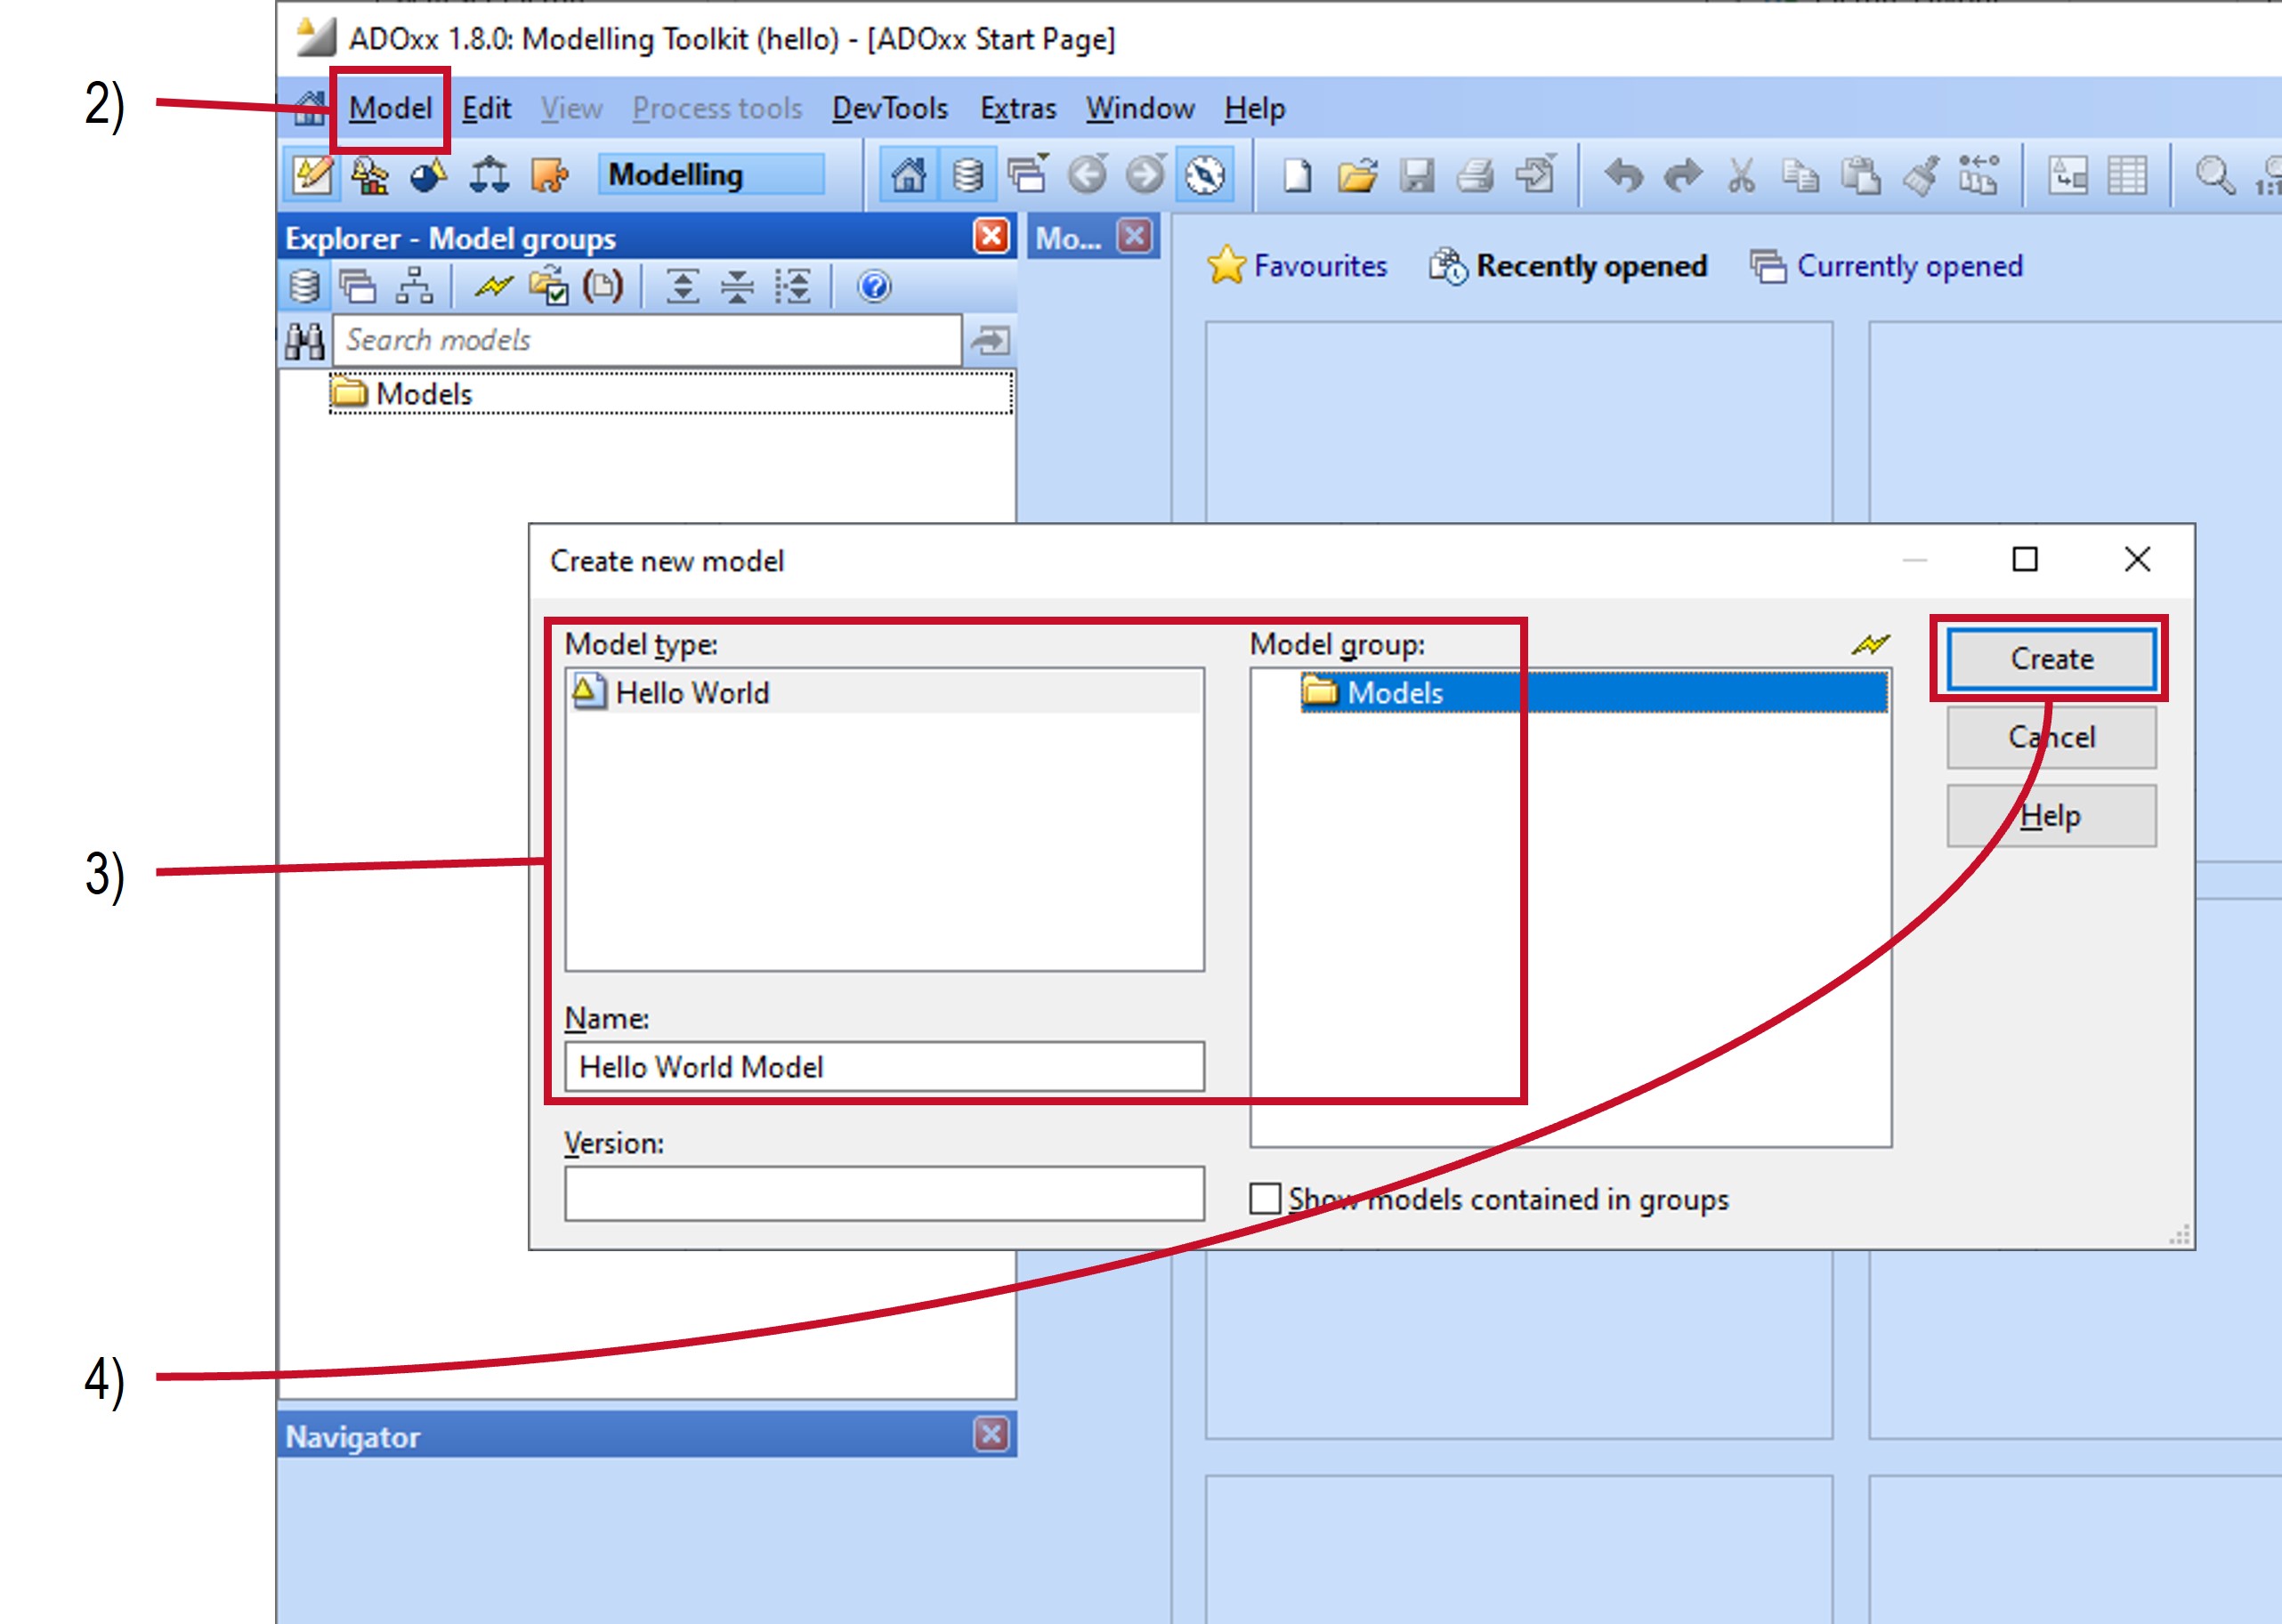
helloand Password alsohello. - Select Model -> New... in the menu.
- Enter the details for the new model:
- Select
Hello Worldfor the Model type. - Enter
Hello World Modelfor the Name. - Select the
Modelsitem in the Model group list.
- Select
- Select Create.
Add Objects to Model
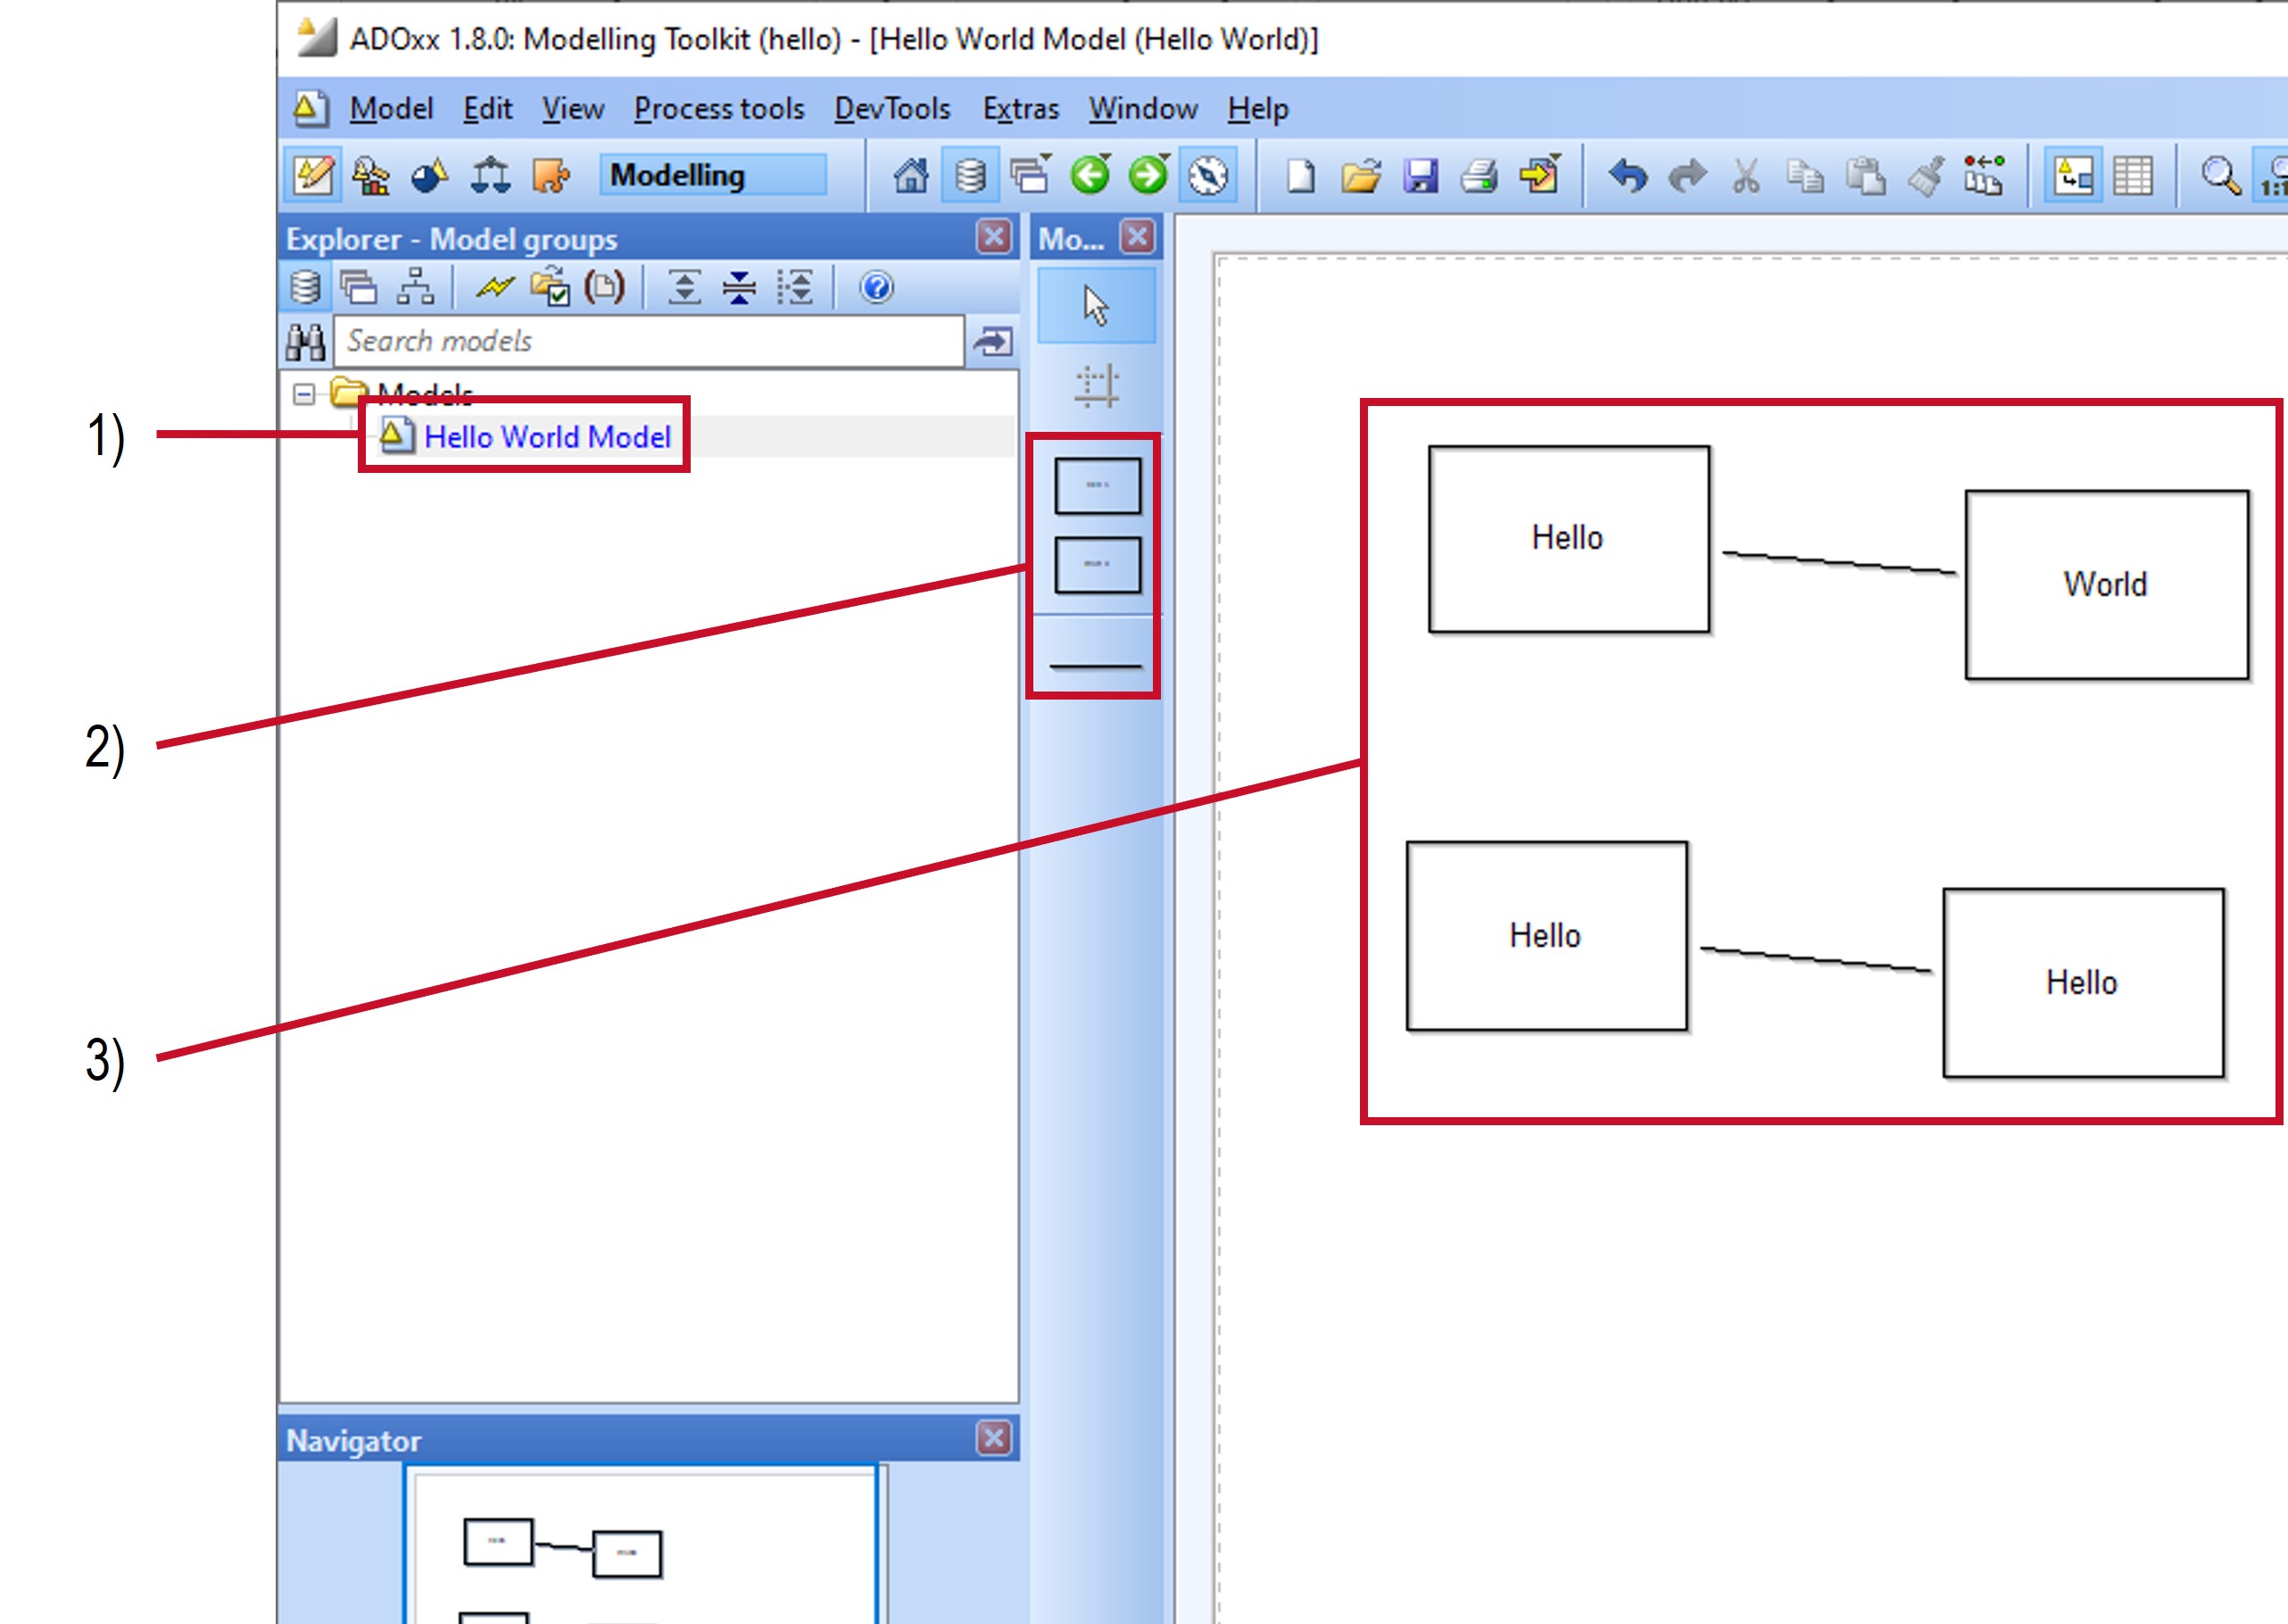
To add Hello and World objects and HelloAnything relations to the model follow the steps in the Modelling Toolkit:
- If the model is not yet opened, then open the model by double clicking on its name in the Explorer.
- Select in the Modelling bar a class for which to create objects.
- Click on the drawing area to create an object at the position.
- An object is created for each click until the right mouse button is selected.
- For relations / connectors first select the source object of the connector and then the target object.
- Switch to a different class in the Modelling bar and repeat step 3.
- Right-click or select the
 mouse-cursor icon in the Modelling bar to switch back to Edit mode, where existing objects can be moved, edited etc.
Where to Continue
The documentation is mainly structured to be read in the order of pages in the list on the left. There are however some pages that could be focused on:
- Check the ADOxx Development Environment and ADOxx Low-Code support for some tools that can help with developing your modelling tool.
- Read some basics about the ADOxx platform in the introduction chapter, the user interface and Notebooks.
- Afterwards the chapter for Modelling Language Implementation introduces the relevant concepts for realizing a modelling language with basic functionalities provided by the platform.
- The pages for the AttrRep Language and GraphRep Language provide a reference for various details used in specific parts.
- To take things a step further the chapter about Mechanisms and Algorithms Implementation provides information on how to realize custom functionalities tailored to your modelling language.
- Here also the AdoScript reference, MessagePort reference and Event reference become useful as a source for looking up specifics.
- Once you have finished configuring your library you can create your own modelling tool by following the packaging procedure
The chapters for ADOxx Components, ADOxx Development Languages, Special Cases and Troubleshooting are more of a reference guide to check specific details on those topics. The same is true for the AdoScript Reference.